Convert, edit, and compress videos/audios in 1000+ formats with high quality.
How to Speed Up Video in After Effects? 2 Ways and More

Posted by Paula Pailaga to Edit Video/Audio Jul 11, 2025
Speeding up your video is an effective way to create a dramatic time-lapse or quick sequence. For this, you may want to use After Effects due to its incredible reputation for manipulating every aspect of video. How to speed up video in After Effects, then? This post outlines the two core methods on how to speed up a video in After Effects alongside an alternative way to speed up video, guiding you through every step to transform your footage into high-speed brilliance.
Guide List
Steps to Speed Up Videos in Adobe After Effects with Time Stretch How to Use Time Remapping to Speed Up Keyframes in After Effects Easier Way to Speed Up Videos to Any Speed without After EffectsSteps to Speed Up Videos in Adobe After Effects with Time Stretch
Speeding up a video in Adobe After Effects can create a dramatic or comedic effect that enhances the storytelling flow, making it more engaging. One of the easiest ways to learn how to speed up video in After Effects is through Time Stretch. This feature allows you to adjust the playback speed of a layer without manually adjusting solo frames or keyframes. If you wish to speed up the whole clip without affecting its quality so much, this tool is incredibly useful.
Step 1Open After Effects and add your video file. Drag it onto the timeline to generate a new composition if one does not already exist. Choose the layer to speed up by clicking on it.
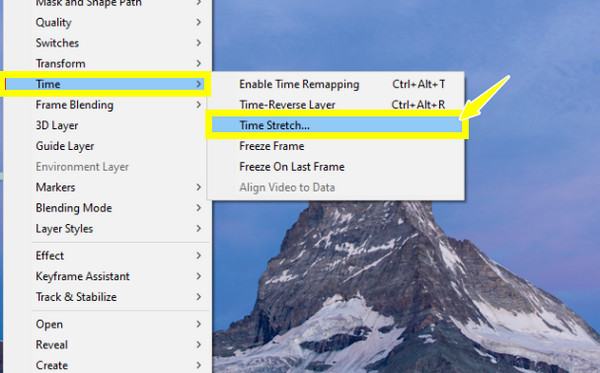
Step 2ARight-click on the chosen layer and select "Time" from the context menu, then choose "Time Stretch". In the new dialog box, lower the percentage value of "Stretch Factor" to speed up the clip.
You can also select from the options under "Hold in Place" to stretch time from a certain point.
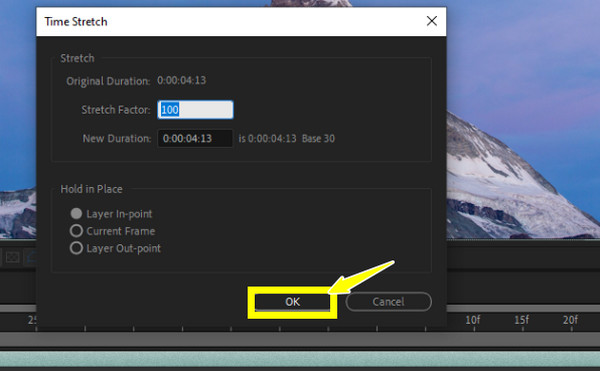
Step 3After that, press the "Spacebar" to watch the result. You can adjust the stretch factor again as needed.
How to Use Time Remapping to Speed Up Keyframes in After Effects
For more precise control over the video speed, here comes the Time Remapping for you in After Effects. Especially when the timing needs to be changed dynamically, Time Remapping is ideal to use. Unlike the previous one, this feature allows you to set keyframes to control the timing of specific moments in your footage. It is typically used in action sequences, music videos, and stylized edits. By learning how to speed up video in After Effects using Time Remapping, you can unlock more advanced timing techniques.
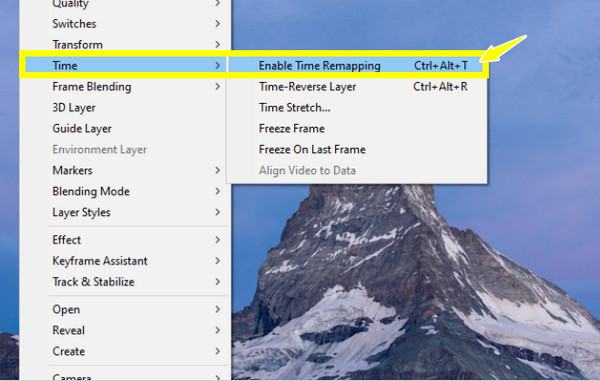
Step 1In the timeline, right-click on your video layer, select "Time", then "Enable Time Remapping". This will add keyframes at the start and end of the clip.
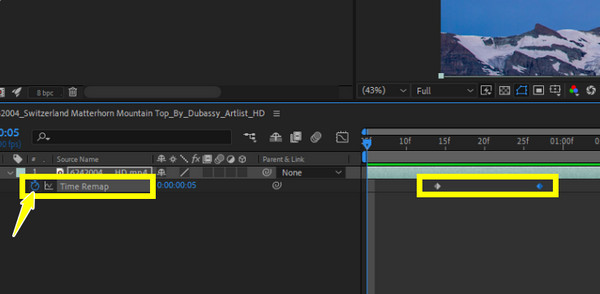
Step 2Next, move the playhead to the point where you want to change speed to start or stop, then click the "Stopwatch" to add a new keyframe. To speed up, move the keyframes closer together. You can directly double speed videos.
Step 3Optionally, for a smoother transition between keyframes, you can adjust the speed graph or apply "Easy Ease," which can be accessed by right-clicking a keyframe, then selecting "Keyframe Assistant" and choosing "Easy Ease".
Step 4Now, preview how the video looks after speeding it up. Adjust keyframe positions or add more as needed to fine-tune speed changes.
Easier Way to Speed Up Videos to Any Speed without After Effects
While After Effects is a powerful tool for advanced video manipulation, it is not necessarily the most convenient option, especially for users who simply seek to speed up a video. With its complex interface and keyframe adjustments, beginners may find learning how to speed up video in After Effects overwhelming. For this, you can try another Adobe tool, Premiere Pro, which offers more straightforward controls but still has a learning curve. If you're looking for a simpler and faster way to speed up your video, 4Easysoft Total Video Converter is your best bet!
Compared to Premiere Pro, 4Easysoft Total Video Converter features a beginner-friendly interface that doesn't intimidate newcomers. You won't have to navigate complicated timelines and won't spend much time learning about sequences and keyframes. Instead, you can upload your video, select a playback speed, and export it in the format of your choice at high quality. Additionally, the tool is lightweight and supports a wide range of formats, so you don't have to worry about more resources and compatibility issues.

Speed up or slow down video to any rate without compromising on quality.
Customize output settings, e.g., frame rate, resolution, codec, format, etc.
Support fast processing with GPU acceleration, allowing for quick export
Built-in editor for adding filters, effects, trimming, cropping, and doing more.
100% Secure
100% Secure
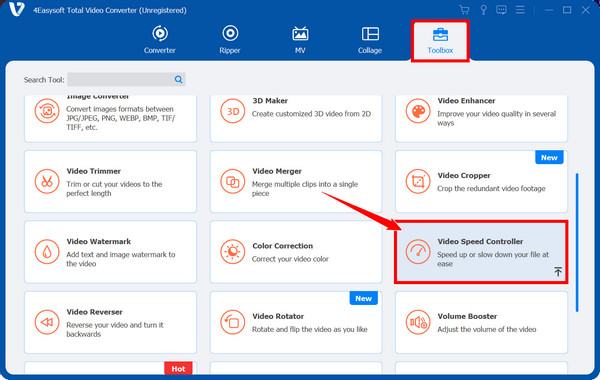
Step 1Open the 4Easysoft Total Video Converter on your computer. From the interface of this video speed changer, click on the "Toolbox" widget tab, locate the "Video Speed Controller," and click on it.
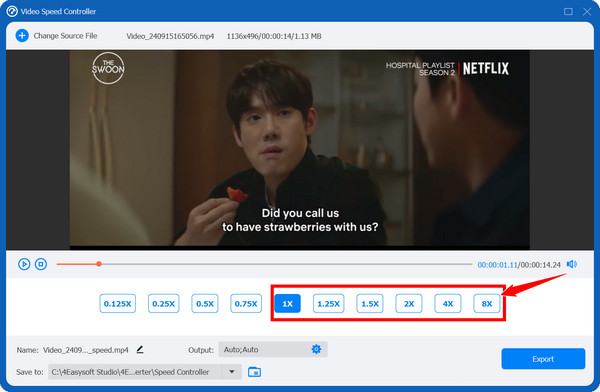
Step 2Add your video by clicking the "Add" button. Once it loads, you will see speed options, such as 1.25x, 1.5x, 2x, and up to 8x. Choose your preferred speed to view the result quickly.
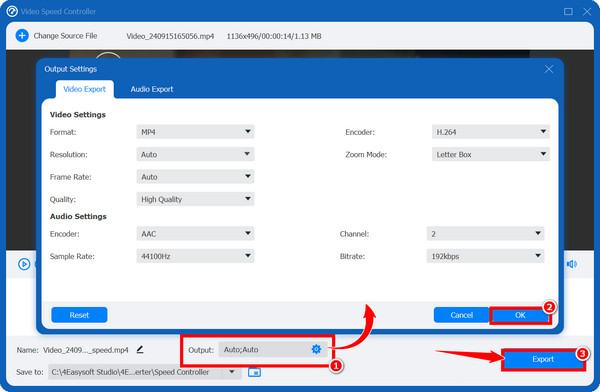
To customize settings such as format, frame rate, resolution, and bitrate to your liking, click the "Settings" button below.
Step 3After all the speed adjustments, click the "Export" button to process and save your video with the new speed settings. No need to wait longer, thanks to the hardware acceleration.
Conclusion
As you've seen today, knowing how to speed up video in After Effects can be done in two ways: Time Stretch for a quick speed adjustment and Time Remapping for a more frame-based control. Each technique is a powerful way to adjust the timing of your clips. However, for an easier and faster solution, 4Easysoft Video Converter offers video speed control. It lets you speed up to any playback speed with just a couple of clicks. Whether it's for social media, casual sharing, projects, or other purposes, this tool exports everything in excellent quality. Enjoy more of it today!
100% Secure
100% Secure