Transfer anything from/to iPhone, iPad, and iPod.
How to Transfer iPod to iPhone with Simple Steps

Posted by Paula Pailaga to iOS Transfer Nov 01, 2022
When you buy a new iPhone 17, you may encounter a problem with how to transfer the data from your iPod to the iPhone quickly. You can use the built-in methods to solve this problem, but it’s time-wasting when you need to transfer large files. If you want to share your iPod with your iPhone safely and fast, here are some professional tools that can help you. Now, read this article to learn more about quickly transferring the iPod to the iPhone.
Guide List
Part 1: How to Transfer iPod to iPhone with A Built-in Tool Part 2: 2 Best Methods to Transfer iPod to iPhone [Safe & Quick] Part 3: Difference between 3 Ways to Transfer iPod to iPhone Part 4: FAQs about Transferring iPod to iPhonePart 1: The Built-in Tool to Transfer iPod to iPhone
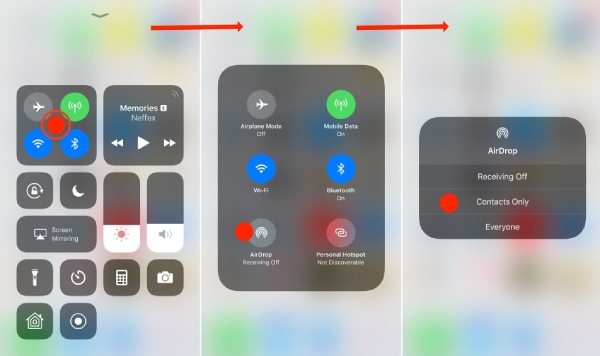
If you do not want to use other software and the USB cable to transfer data, AirDrop is the default way for you. Make sure your iPod and iPhone turn on the Wi-Fi and Bluetooth, then you can quickly move your iPod with your iPhone. But when you want to move multiple photos and songs, you must wait a long time.
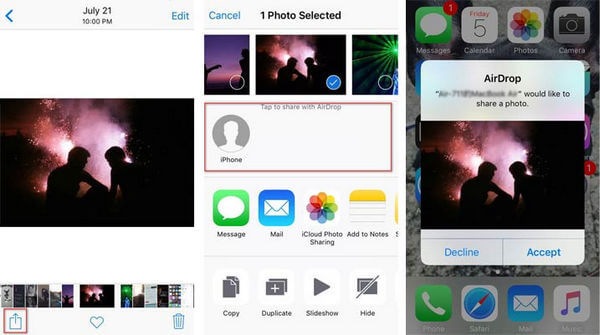
Step 1Launch your iPod and iPhone by turning on the Wi-Fi and Bluetooth. If you want to transfer the photos to your iPhone, you need to open the Photos app and choose the photos you want to transfer. And you should click the Share button.
Step 3Then tap the AirDrop button from the Control Center on your iPod. You can see the three options, including Receiving Off, Contacts Only, and Everyone. You should choose the last two options.
Step 3After that, you can choose your iPhone and start transferring photos from the iPod to the iPhone. Then your iPhone will pop up the window, and you need to tap the Accept button to receive the data transmission. You can also use this way to transfer other data to iPhone.
Part 2: 2 Best Methods to Transfer iPod to iPhone
Method 1: 4Easysoft iPhone Transfer
When you want to transfer big data from iPod to iPhone within a few minutes, 4Easysoft iPhone Transfer must be the best way you should try. This professional transfer can automatically scan all local data of your iPod and transfer them in one click. Moreover, it has other special features, such as the Photo Manager to convert HEIC photos to JPG/PNG, make a unique ringtone for your iPhone, and backup contacts. Now, you can learn how to transfer the iPod to the iPhone in detail with this tool.
Support transfer of all media data between the iOS device, computer, and iTunes in a batch with fast speed.
Sync the iTunes library with audio and videos on your iOS device and computer.
Provide the Photo Manager, Contacts Assistant, and Music Editor to edit and manage your data.
Support removing transferred data to free up more space.
100% Secure
100% Secure
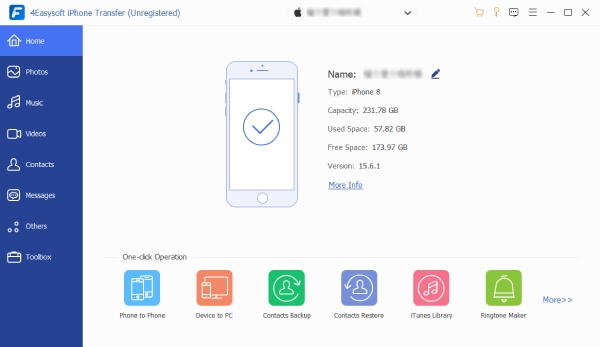
Step 1After downloading the 4Easysofy iPhone Transfer and launch it. Then connect your iPod and iPhone to your computer with a stable USB cable. After a few minutes, you can see the information about your phone on the interface of the software. If you are using iOS 13 and later, you should allow access to your device by tapping the Trust button.
Step 2On the left side of the window, you can select transfer what data to iPhone, such as music, photos, and contacts. If you want to transfer music from your iPod to the new iPhone, you can click the Music button to see all the photos on your iPod. Then you can select some songs or choose all.
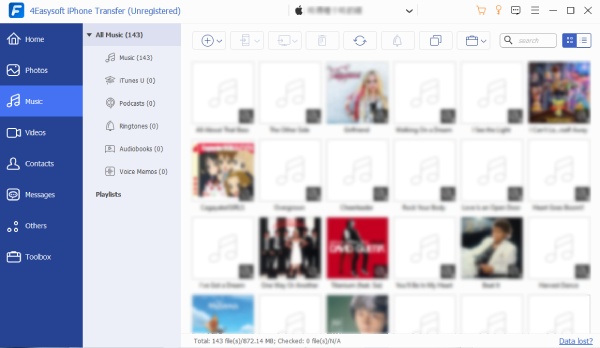
Step 3Then click the Export to Device button and select the desired place to store these files. You can also transfer your music from your iPod to the computer by clicking the Export to PC button. Now, you can transfer your iPod to the new iPhone and listen to music on your new iPhone.

Method 2: iTunes
If you have downloaded iTunes on your computer, you can also use it to transfer the old iPod to the new iPhone. But before transmission, you need to transfer the data on the iPod to iTunes, so this process is time-consuming. And you cannot select several items to transfer.
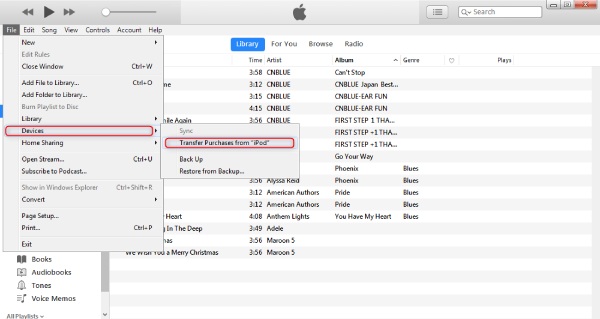
Step 1Launch iTunes and connect your iPod to the computer with the USB cable, click the File button and choose the Devices option. Then select Transfer Purchases from "iPod" option.
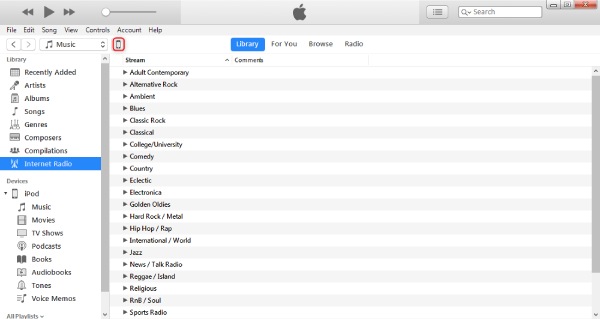
Step 2After transferring the data from iPod to iTunes, you need to connect the iPhone to your computer with the USB cable. Click the iPhone icon button to open the new window, and you can see all the information about your iPhone.
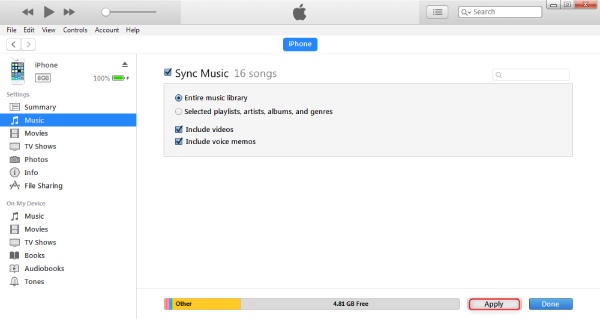
Step 3You can sync the music, photos, movies, and TV shows according to your needs. For example, you can sync music to your iPhone by clicking the Music button. It will pop up a new window, and you should check the Sync Music option. Then click the Apply button to start transferring the iPod to iPhone.
Part 3: Difference between 3 Ways to Transfer iPod to iPhone
| AirDrop | 4Easysoft iPhone Transfer | iTunes | |
| Transmission Speed | Slow | Fast | Fast |
| Partial Transmission | Yes | Yes | No |
| Additional Features | No | Yes | Yes |
| Transfer Data in Batch | No | Yes | Yes |
From the table, you can see that each method has its advantages and disadvantages. But on the whole, 4Easysoft iPhone Transfer can meet all your needs to transfer an iPod to iPhone.
Part 4: FAQs about Transferring iPod to iPhone
-
Why can't I open photos transferred from iPod to iPhone?
Maybe the image format is not supported by iPhone. iPhone supports PNG, JPG, and HEIC. So you should check the format of your pictures.
-
How to transfer the iPod to the iPhone with Dropbox?
First, you need to log in to Dropbox and upload the data on the iPod to it. Then log in to Dropbox on your iPhone with the same account and password to download data. You can also use it to transfer music from iPod to a PC.
-
Why is my original data missing after I use iTunes to transfer my iPod to iPhone?
iTunes is a good transfer, but sometimes it will delete your original data after transferring data. So if you want to use iTunes/iCloud to transfer data, you should back up data first.
Conclusion
That’s all. Now you can choose one of the above-recommended methods to use according to your needs and preferences. AirDrop and iTunes are the default tools for data transmission, but they are time-consuming. You can try the 4Easysoft iPhone Transfer with fast speed, and it has more features for you.
100% Secure
100% Secure