Reliable video converter, editor, and compressor for daily tasks.

Quick Tutorial: How to Reverse a Video in Premiere Pro

Posted by Paula Pailaga to Edit Video/Audio Aug 01, 2025
Reversing video is a creative editing technique that Adobe Premiere Pro makes easy in just a few steps, whether you want to reverse a scene for dramatic effect or correct a clip that was recorded in the wrong direction. As professional video editing software, Premiere Pro provides powerful tools to reverse video while maintaining high quality and control. In this guide, you'll learn all about reversing video in Premiere Pro.
Guide List
Tips Before Reversing a Video in Premiere Pro Pros & Cons: Reverse a Video in Premiere Pro How to Reverse a Video in Adobe Premiere Pro The Hassle-Free Way to Reverse a VideoTips Before Reversing a Video in Premiere Pro
Before you jump into reversing your video, keep these tips in mind to save time and avoid common issues:
1. Check Clip’s Length
Long videos or high-frame-rate footage can take more time to process. If possible, trim the clip to just the portion you want reversed before applying the effect.
2. Consider Motion & Speed
Reversed motion can look jittery if your original video has lots of fast movement. Experiment with speed adjustments or frame blending to smooth the playback.” /]3. Preview Before Exporting
Since the operation of reversing a video in Premiere Pro largely depends on the automatic process, it is necessary to preview your project before exporting it. Through the preview, you can check if the video is presented in the way you want. If it doesn't look right, you can make adjustments in time.
4. Save a Backup
Make a duplicate of your original project or clip before applying the reverse effect. This way, you can easily return to the original version if needed.
Pros & Cons: Reverse a Video in Premiere Pro
Before you use Adobe Premiere Pro software and learn how to reverse a video, it is essential to understand the working characteristics of this software. It is necessary to first learn about the advantages and limitations of this professional editing software. The reason is that Premiere Pro may not be suitable for all the projects you need to handle. This section provides you with the main advantages and disadvantages of Premiere Pro, so that you can choose the most suitable solution based on your own needs:
Pros
Professional Quality Results: For the project you are working on, reversing a video in Premiere Pro will not affect the original quality of your video. Therefore, it is highly suitable for professional projects and high-quality output.
Precise Control Over Timing: You can fine-tune speed, duration, and transition effects when reversing a video, ensuring the final result looks exactly how you want it.
Integrated Workflow: Since reversing is built directly into Premiere Pro, you don’t need extra software. You can combine the effect seamlessly with other edits like color grading or cropping.
Cons
Learning Curve: Premiere Pro’s interface can be intimidating for beginners, and finding the reverse options takes time if you’re not familiar with this 4K video editor.
Slower Processing for Large Files: Reversing long or high-resolution clips can significantly slow down your editing workflow, especially on less powerful computers.
Unusable Reversed Audio: When you reverse a video, the original audio is reversed too, resulting in distorted sound that usually needs to be muted or replaced manually.
How to Reverse a Video in Adobe Premiere Pro
Reversing a video in Adobe Premiere Pro is much easier than it sounds. With just a few clicks, you can make any clip play backwards to create an eye-catching effect or fix a recording problem. In this section, you'll learn step-by-step how to reverse your footage, adjust the playback speed, and manage the audio so that your final video looks polished and professional. Follow these instructions and you'll have your reversed clip ready in just minutes:
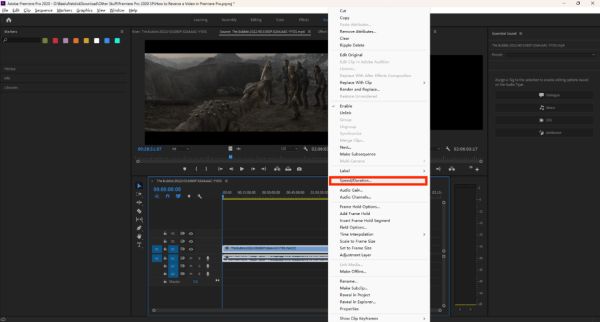
Step 1Launch Adobe Premiere Pro and create a new project to import your video. Drag the video into the timeline.

Step 2Right-click the timeline and click the "Speed/Duration..." button to summon a new window.
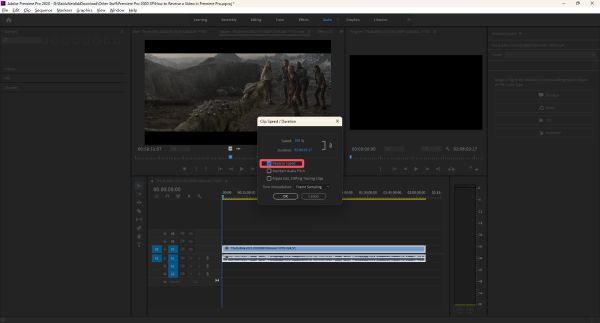
Step 3Finally, click the "Reverse Speed" button to reverse the video in Adobe Premiere Pro.
The Hassle-Free Way to Reverse a Video
If you find Adobe Premiere Pro too complex or time-consuming, 4Easysoft Total Video Converter is a much simpler alternative for reversing videos quickly. This user-friendly software is designed for beginners and busy creators who want professional results without a steep learning curve.
Besides reversing, you can also trim, crop, merge, and enhance your videos using built-in editing tools. You can even adjust output settings like resolution and bitrate to balance quality and file size. Compared to Premiere Pro, 4Easysoft offers a much faster workflow with clear instructions, making it ideal for casual users or anyone who needs quick edits for making a tutorial video or so on.
Directly reverse your video without complicated operations.
Keep the original quality of video during the reversing process.
APreview to check if your video file is adjusted correctly.
Support video formats that Premiere Pro does not support.
100% Secure
100% Secure
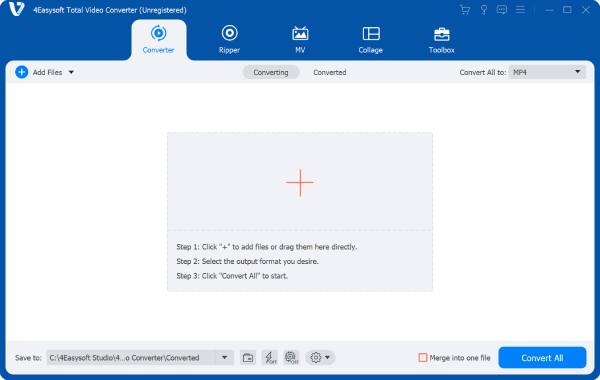
Step 1Launch 4Easysoft Total Video Converter and click the "Video Reverser" button under the "Toolbox" tab.

Step 2In the new pop-up window, click the "Add Files" button to import the video for reversion.
Step 3Finally, click the "Export" button to reverse the video in 4Easysoft Total Video Converter.

Conclusion
Playing back your video can instantly make your content more creative and help you correct mistakes during recording. Adobe Premiere Pro offers professional-level controls and high-quality output, but it can be complex for beginners and slow for large files. If you prefer a faster, easier-to-use option, 4Easysoft Total Video Converter is an excellent alternative. Try it now and see how easy it is to reverse your video in just a few clicks.
100% Secure
100% Secure