Transfer anything from/to iPhone, iPad, and iPod.

How to Hide Photos on iPhone of iOS 26 and 27 beta? 4 Simple Ways

Posted by Paula Pailaga to iOS Transfer Jan 09, 2026
For personal photos stored on your iPhone, privacy matters more than ever! Thankfully, Apple has ways to keep your pictures out of sight from the main library, as you can hide photos on iPhone to enhance your privacy further. This guide will walk you through 4 easy ways to make photos private on iPhone, from using built-in features to using secure apps. Each method here will help maintain your privacy effortlessly, guarding your personal data without deleting it.
Guide List
Hide Photos using the Photos app on iPhone How to Lock Photos in the Notes app on iPhone How to Hide Hidden Albums in the Photos app The Best Way to Transfer iPhone Photos to Hide ThemHide Photos using the Photos app on iPhone
To start, the simplest way to hide photos on iPhone is using the built-in Photos app. Apple made this feature for anyone who wants quick privacy without extra apps or changing advanced settings. Once you hide photos using this method, all selected images are removed from your main library and stored in a Hidden album, ensuring all private and sensitive pictures are no longer visible when someone scrolls through your Photos app.
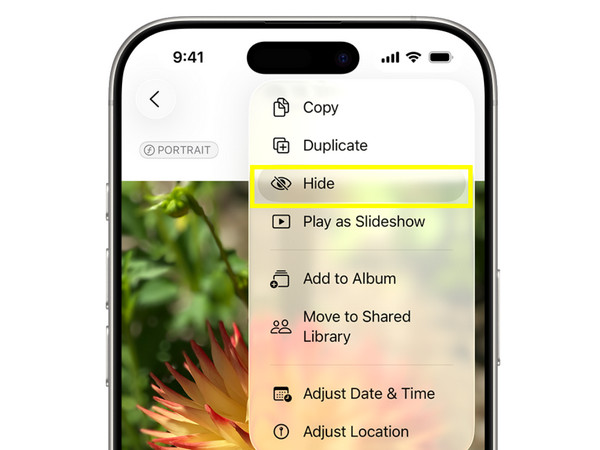
Step 1Open the "Photos" app on your iOS device. From the main library, tap "Select" and choose all photos you wish to hide.
Step 2Tap the "three-dot" icon or "Share" button.
Step 3Select "Hide" from the options, then confirm the action. You can create a hidden album on iPhone and put the selected photos into it.
How to Lock Photos in the Notes app on iPhone
Moving on, if you wish to add an extra layer of security beyond simply hiding photos, locking them in the Notes app is a smart alternative to try. This method works by placing your photos inside a note and protecting it with Face ID, Touch ID, or a password. Unlike the previous method, using locked notes to keep iPhone photos private prevents unauthorized users from viewing the images. Also, you can store multiple photos here and even add text descriptions if needed.
Step 1Launch the "Photos" app and decide all the photos you wish to hide.
Step 2Tap the "Share" button, then select "Notes" from the share methods below.
Step 3You can save the photos to a new note or an existing one.
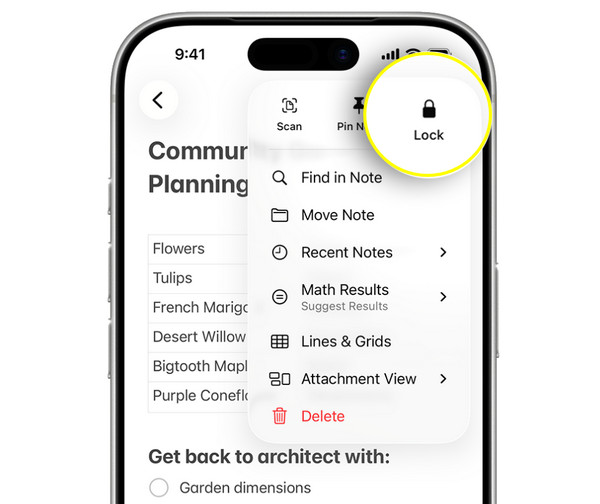
Step 4Afterward, open the "Notes" app and locate the note containing the selected photos.
Step 5Tap the "three-dot" icon, then tap on "Lock". Set a password or enable Face ID/Touch ID to lock hidden photos on iPhone.
How to Hide Hidden Albums in the Photos app
After hiding private photos on iPhone, you may notice that the Hidden album itself is still visible, which can defeat the purpose for some users. Luckily, Apple lets you hide the Hidden album entirely from your iPhone's settings. This extra step ensures that even the album containing your private photos is no longer visible in the Photos app. It is a simple yet effective way to strengthen your privacy on your iOS device. Though others can find hidden photos on iPhone via the Show Hidden Album toggle.
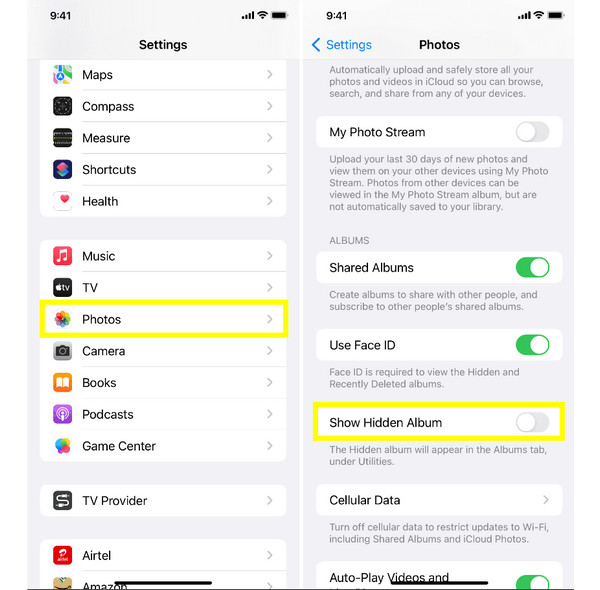
Step 1Inside the "Settings" app on your iPhone, scroll down and tap "Photos".
Step 2There, toggle off the "Show Hidden Album" switch button.
Step 3Now, go back to the "Photos" app to confirm the Hidden album is no longer visible.
The Best Way to Transfer iPhone Photos to Hide Them
With the photo transfer tool becoming more powerful and user-friendly, the 4Easysoft iPhone Transfer is the one that stands out as a dependable all-in-one solution for moving and managing your photo security. Instead of leaving sensitive media on your iOS device, hide photos on iPhone by transferring them to your computer or USB drive, keeping them entirely out of sight. Even if your iPhone has thousands of pictures, the program handles large libraries efficiently thanks to its fast and stable transfer performance. You will not need any technical skills either; the main screen is clean and easy to navigate from start to finish.

Multiple file types are supported, including photos, videos, music, and more.
Lets you organize, manage, and edit iPhone data like photos directly.
Includes a built-in preview to review photos first before transferring.
100% Secure
100% Secure
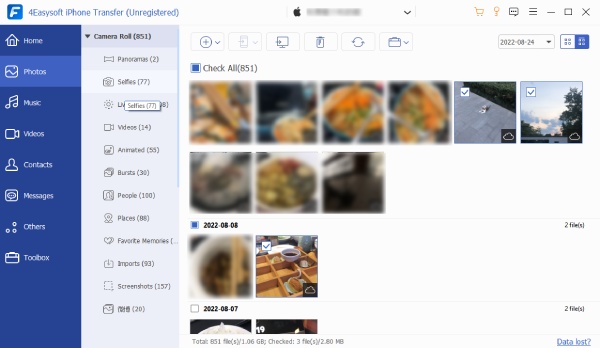
Step 1Start 4Easysoft iPhone Transfer on your computer, and link your iPhone using a USB cable. If prompted on your iPhone screen, tap on "Trust" from the notification to allow access. Once paired, your iPhone details will show up on the main screen.
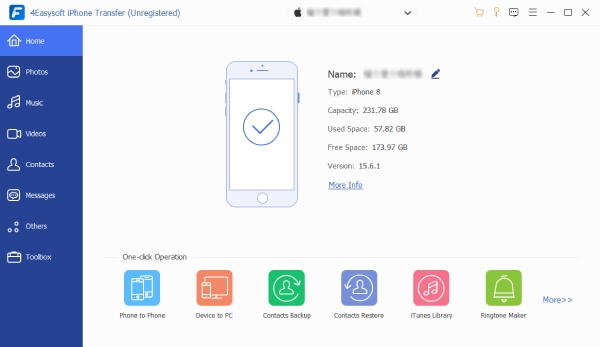
Step 2Click "Photos" from the left-hand menu. Then, select the images you intend to remove from your iPhone. Before proceeding, plug in your USB drive or decide on a secure folder on your PC where the images will be transferred.
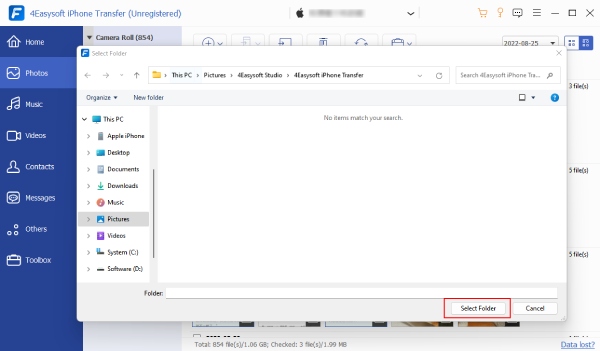
Step 3Once done, click the "Export to PC" button, then choose the USB drive or selected folder as the destination. Confirm the location by clicking the "Select Folder" button, and the transfer will start immediately. Afterward, you can delete all chosen photos from your iPhone.
Conclusion
As you have seen in this guide, you can hide iPhone photos in four easy ways! From the direct Photos app, lock images inside the Notes app, to hide the Hidden album itself, each of these built-in iPhone options works well for everyday situations. However, if you wish for the most secure and long-term solution, transferring iPhone photos to a computer is the smartest choice. For this, 4Easysoft iPhone Transfer is useful. This software allows you to selectively move pictures at high speed, preview files before exporting, and manage all iPhone data with ease. Safely hide iPhone photos beyond your device today!
100% Secure
100% Secure