Record, edit, and share video from all sources.

How to Fix Laggy OBS? 6 Tips to Try this 2025 (and Why?)

Posted by Paula Pailaga to Record Video Jun 10, 2025
Lagging OBS streams and recordings are a total nightmare for any content creator. This frustrating stutter can turn your exciting experience into a painful one. How to fix laggy OBS? If you’re struggling with it, well, you’re not alone. Thankfully, OBS is a tool that has tons of settings that can eliminate those hiccups when configured well. With this guide, you will learn the causes and step-by-step ways to fix laggy OBS. Dive in now and get OBS back to run smoothly.
Guide List
Get the Reasons Why OBS Is Laggy Best No-Lag Screen Recorder to Avoid OBS Laggy Issue How to Fix Laggy OBS? 6 Fixes HereGet the Reasons Why OBS Is Laggy
Does OBS lag when playing games on your end? OBS Studio is known as an excellent tool for streamers and content creators, but like any other software, it can sometimes experience stutters and lags. So, before getting into the six solutions on how to fix laggy OBS, first look at the five causes of OBS lag:
• Limited Hardware Capacity. Once your system is pushed beyond its limits, expect instability. Since OBS Studio needs significant processing for encoding, a strained CPU, RAM, or GPU will manifest laggy OBS during streaming and recording.
• Connectivity Issue. The stream does not end with encoding since OBS needs to transmit data to viewers. So, a weak connection will result in lag and dropped frames.
• Improper Settings Configuration. While powerful, the wide range of OBS settings can cause lag and other performance issues if not set correctly.
• Application Conflicts. Running multiple apps at once can affect OBS performance as they consume huge resources, leading to lag and stutter.
• Version Incompatibility. Just as with other software, an outdated OBS as well as drivers, include bugs and compatibility conflicts. These can contribute to lag and other problems.
Best No-Lag Screen Recorder to Avoid OBS Laggy Issue
To steer clear of the laggy OBS issue, why not aim for a top-tier alternative to record screen activities? Use the best 4Easysoft Screen Recorder, a dedicated tool made for high-quality video recording with no performance hiccups and complicated setups. With 4Easysoft, you can have a smooth and consistent recording experience, with customizable options for frame rate, bitrate, resolution, and more to suit your specific needs. Whether you want to record gameplay, meetings, tutorials, or anything else, the tool will let you quickly capture screen, audio, and even webcam footage as you wish. The best part? It does all of this while keeping your resource usage minimal and giving excellent quality.

Choose either full or custom screen capture without degrading quality.
Quickly review and make edits like trimming, annotating, etc.
Real-time annotations and taking screenshots are supported.
Ideal for lower-spec systems as it is optimized for minimal resource consumption.
100% Secure
100% Secure
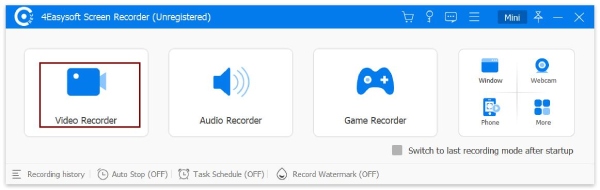
Step 1Open the 4Easysoft Screen Recorder and decide on the “Video Recorder” button among other recording modes.
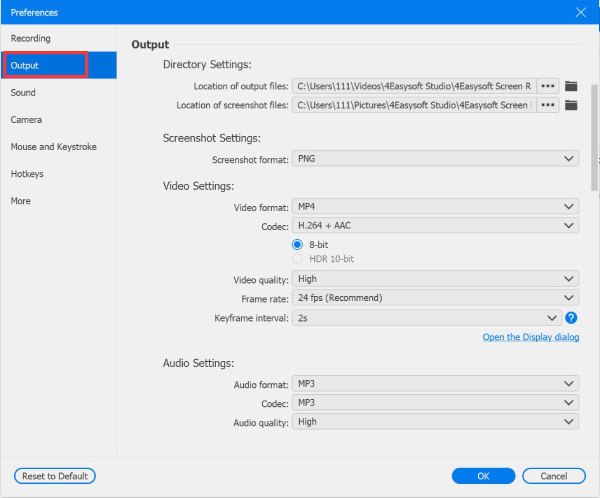
Next, click on the “Settings” button and go to the “Output” tab. Here, adjust the format, codec, quality, and more based on your needs.
Step 2Choose what part of your screen you want to record. Select “Full” to capture everything, or pick “Custom” to select a specific area. You can resize the frame regardless of what you choose.
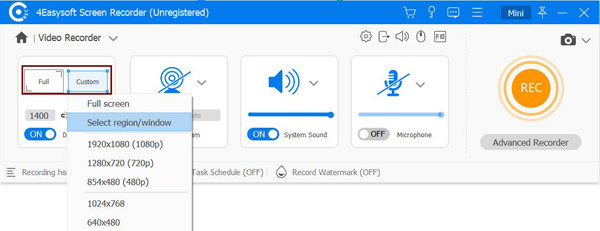
Turn on the “System Sound” option to capture computer audio, and enable the “Microphone” option to include your voice. Adjust both volume levels as needed.

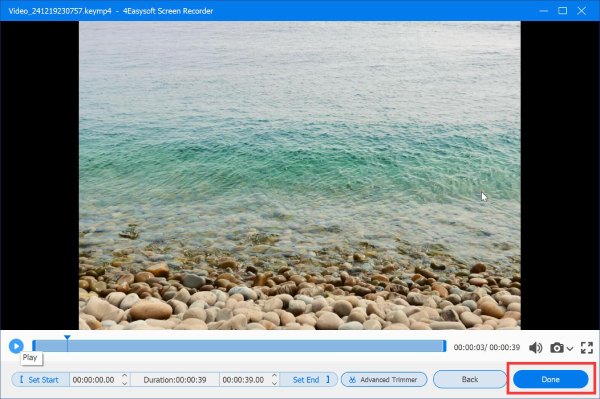
Step 3Whenever you’re ready, click the “REC” button, and a countdown will start. While recording, you can use the toolbar to annotate and take screenshots.

Step 4After you’re done, click the “Stop” button to review your recording. You can trim unwanted parts here at the start or end. Once you’re happy with it, click the “Done” button to save your file.
How to Fix Laggy OBS? 6 Fixes Here
Knowing those reasons can significantly help you take action to fix laggy OBS. Now, in this part, there are six steps you can follow to improve performance and get back the smoother streaming and recording experience.
Fix 1. Adjust the Bitrate Settings
Among the most common causes of laggy OBS is having a bitrate that is too high for your internet connection or system. Lowering it can help lessen the lag and improve the streaming performance without degrading too much quality. Here’s how to change the OBS recording settings:
• In OBS, head to “Settings”. Go to the “Output” tab, and from “Streaming”, reduce the “Bitrate” and “Apply” the changes.
Fix 2. Check Your Hardware
Another thing about laggy OBS is that it can occur when your hardware is incapable of handling the streaming or recording load. For this, check your CPU, GPU, and RAM to make sure they have enough power during your sessions.
• Please go through your hardware carefully and see if there are any broken parts or routers that lead to conflicts when you use OBS. Otherwise, you can try closing unnecessary programs running in the background while using OBS.
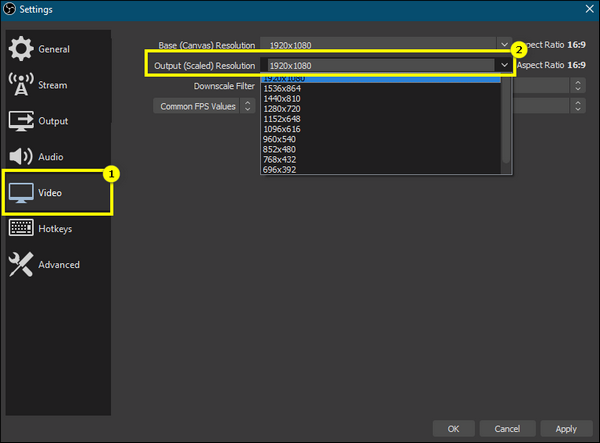
Fix 3. Lower the Resolution
Streaming or recording at high resolution can cause laggy OBS, especially if your system and connection cannot handle it. So, just like bitrate, lowering the resolution can help reduce the load and get back the smooth performance.
• From the “Settings” window in OBS, head to the “Video” tab, then look for “Output Resolution” and set it to a lower value, e.g., 1080p to 720p.
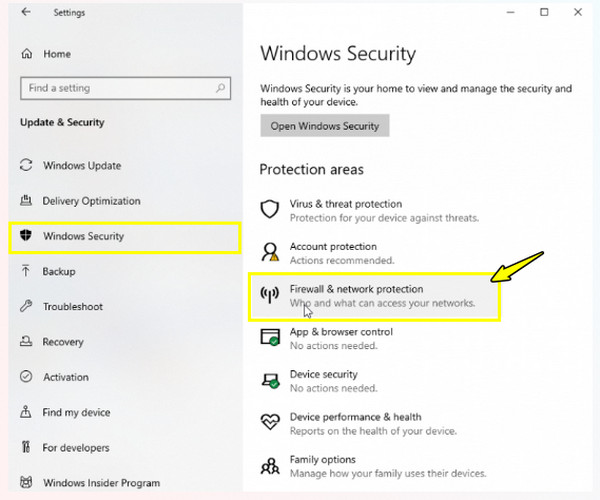
Fix 4. Inspect the Security and Firewall
Aside from settings, sometimes, security software or firewall can interfere with how OBS performs, leading to lag or connection issues. Thus, check if OBS is allowed through your firewall and security software. Here’s how to fix laggy OBS now:
• In the Settings app on your computer, go to “Update & Security” or another similar option, then click on “Windows Security” to check firewall settings. From this window, head to “Firewall & network protection) to choose network settings. Locate “Microsoft Defender Firewall” and turn it off.
Fix 5. Switch to a Stable Network
As always said, an unstable network can lead to laggy OBS and dropped frames while streaming and recording. Ensure your connection is high enough that it is capable of handling the demands of the OBS program.
• For this solution, you can perform a speed test to check both your download and upload speeds. Or, you can switch to another available network with a stable connection.
Fix 6. Use Wired Connection
With wireless connections, they can be unreliable most of the time, leading to laggy OBS and buffering issues. Using a wired one will provide a more stable and consistent internet connection, reducing lag.
• Connect your computer straight to the router with an Ethernet cable, then disable Wi-Fi on your PC. Restart OBS and, after a while, check the performance for improvements.
| Methods to Fix Laggy OBS | Difficulty | Success Rate |
| Adjust the Bitrate Settings | Easy | High |
| Check Your Hardware | Average | High |
| Lower the Resolution | Easy | Average |
| Inspect the Security and Firewall | Average | Average |
| Switch to a Stable Network | Easy | High |
| Use Wired Connection | Easy | High |
Conclusion
Laggy OBS is indeed a frustrating issue for streamers and content creators out there, but as you’ve seen here, with the right adjustments and enough resources, you can effectively learn how to fix laggy OBS. However, for a more seamless recording without the constant struggle of performance issues, the 4Easysoft Screen Recorder is the perfect alternative! Its smooth, low-impact performance and high-quality recording capabilities make it the best choice for everyone to have a more efficient and enjoyable recording experience.
100% Secure
100% Secure