Reliable video converter, editor, and compressor for daily tasks.
Detailed Steps on How to Fade In/Out Audio in Premiere Pro

Posted by Paula Pailaga to Edit Video/Audio Mar 25, 2024
When you want to be creative with your audio while editing it on Premiere Pro but don’t know precisely how to do it. This is quite annoying, especially when you already envision how your audio will start and end. Well, thankfully, you found this page! This post features 2 trouble-free ways showing you how to fade in and fade out audio on Premiere Pro. So, without any further ado, start exploring them now.
Guide List
3 Different Types of Fade in/out Effects in Premiere Pro Detailed Steps on How to Fade in/out Effect in Premiere The Easiest Alternative Way to Fade in/out Audio without Premiere FAQs about How to Fade in/out Audio in Premiere3 Different Types of Fade in/out Effects in Premiere Pro
Before you jump into the steps showing you how to fade out audio in Premiere Pro, you may first explore Premiere Pro’s 3 different types of fade-in/out! So, without further delay, explore each and see which suits your needs.
- Constant Gain - This fade-in/out of Premiere Pro offers an increasing or decreasing audio rate as you transition between different clips. This one provides a little sharper and less smooth output than other types.
- Constant Power - With this type of transition, your audio decreases slowly at first, and then it fades more quickly when it reaches the end of the clip. The audio volume quickly increases once it reaches the other clip and will slow towards the end. If you compare this type to Constant Gain, it offers unjarring, smoother, and gradual audio transition.
- Exponential Fade - If you are looking for an audio effect that offers transitions that modify the clip’s volume, start slowly up or down, and change faster and faster until the end. Exponential Fade is what you are searching for!
Detailed Steps on How to Fade in/out Effect in Premiere
That’s it! Those are the 3 different types of fade-in and fade-out audio effects in Premiere Pro! Adding these effects to your video clip to modify its audio is not easy. You might find it hard on your end to do it. But don’t worry; this post featured the most straightforward way how to fade audio in Premiere Pro using those types of fade-in/out effects. So, start exploring the steps below!
Step 1Run the "Premiere Pro" program on your computer, access the video clips you wish to add an audio effect and add it to the timeline.
Step 2After that, click the "Effect" tab at the upper part of the program’s interface. Next, select the "Crossfade" effect, and then you will see all the mentioned fade-in/out types earlier.
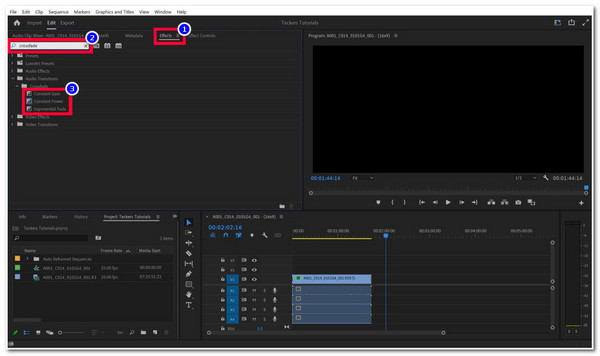
Step 3Next, select the Crossfade effect you wish to add to your clip, drag it to the timeline, and place it either at the start or end of the clip. Ensure you place them between your video clips.
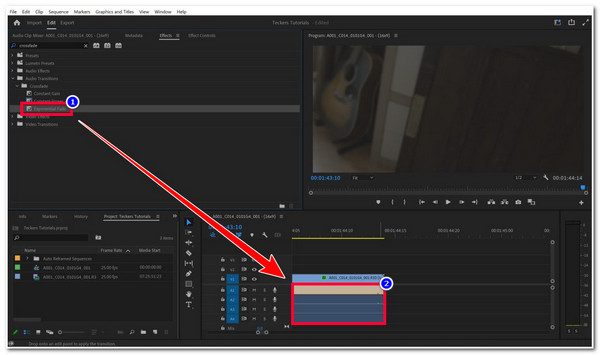
Step 4Then, if you want to modify the effects, you can stretch them to adjust the timing and cover the parts of the audio/tracks. Or, move them to the part you wish to be. And that’s it! That’s how you make audio fade in Premiere Pro!
The Easiest Alternative Way to Fade in/out Audio without Premiere
There you have it! Those are the 3 types of fade-in/out and steps on how to fade in audio in the Premiere! Now, if you are just working on a simple video project where you wish to add a fade-in/out effect, the Premiere Pro is too complex for you. Not to mention that this tool offers expensive subscriptions. If you want a much easier way to fade in/out audio, then you can use the 4Easysoft Total Video Converter! This professional video editor tool supports an MV Maker with built-in Fade-In/Out options! It also supports a Volume and Delay modifier that lets you modify the loudness of your video clip’s audio and timing! Moreover, it also lets you keep the original audio track or change it with a different background music. With these features, this tool is the best alternative to fade in and fade out audio of Premiere Pro.

Infused with an intuitive interface with easy-to-use yet advanced video and audio features.
Easily add fade in and fade out effects to each of your clips with the preferred order.
Built-in volume booster and delay sliders to modify your audio’s loudness and timing.
Output tweaking option to adjust the audio format, channel, sample rate, and more.
100% Secure
100% Secure
How to Add Fade In/Out Audio Effect Using 4Easysoft Total Video Converter as an Alternative to Fade In and Fade Out of Premiere Pro:
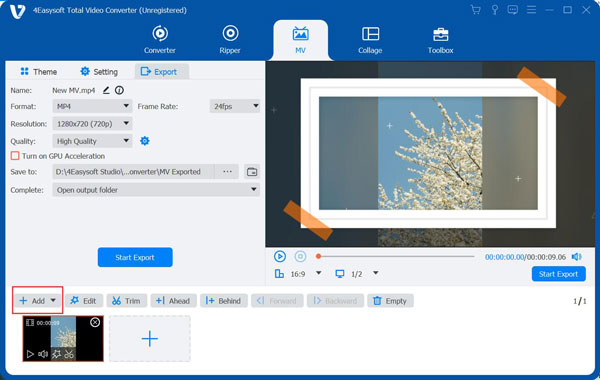
Step 1Download and install the 4Easysoft Total Video Converter tool on your Windows or Mac computer. Then, launch the tool, select the MV tab, and click the "Add" button to import the video clips you wish to add fade-in and out effects.
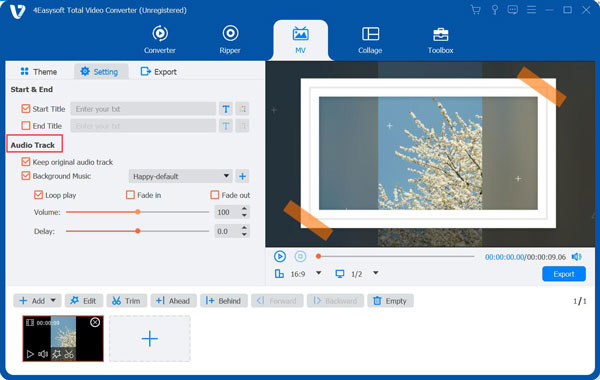
Step 2Next, select the "Setting" tab and head to the Audio Track section. After that, choose between the "Fade in and Fade out" options by clicking their corresponding checkbox. You can preview the audio clip and see how the fade in and fade out affect the audio of the clip.
Step 3If you want to add graphical effects to your video clip to change its look, you can select the "Theme" tab and choose one of the displayed themes.

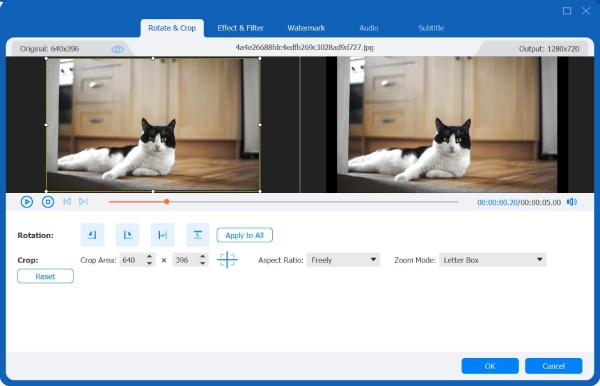
Step 4Aside from that, if you wish to modify some of the aspects of your video, click the "Edit" button. On the new window, you can Rotate, add Effects & Filters, Watermark, etc.
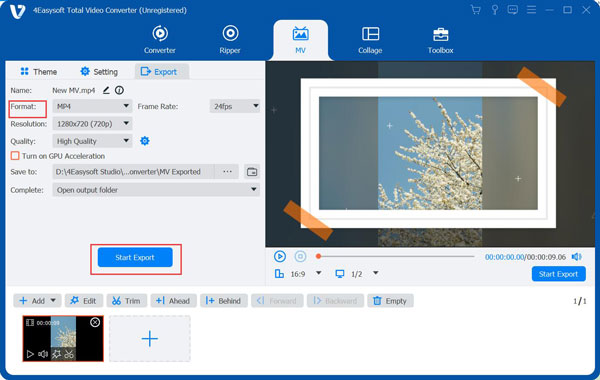
Step 5Once you are satisfied with the changes you’ve made to your video clip, especially the fade-in/out effects, you can now export your edited clip! Cltiick the "Export" tab, choose your preferred Resolution, Quality, and Frame Rate, and then click the "Start Export" button.
FAQs about How to Fade in/out Audio in Premiere
-
How do you change Premiere Pro’s fade-in/out audio effect speed?
If you wish to modify the speed of the crossfade effect you have applied to your clip, you just need to double-click the effect, type the duration, and click the "OK" button!
-
How do I remove the added crossfade effect to the audio clip in Premiere Pro?
If you want to remove the added crossfade effect, you have to right-click the clip that you have added the effect and select the Remove Effects option. Then, choose the "Audio Effects" from the options.
-
Is there a way I can set the audio transition to a specific Crossfade without adding it manually?
Yes, there is! Premiere Pro allows you to create a default transition of a specific Crossfade effect. To do this, you need to access the Effects panel, select the Crossfade, choose the effect you wish to use as default, right-click on it, and select the Set Selected as Default Transition.
Conclusion
There you have it! Those are the Premiere’s supported fade-in/out effects and 2 trouble-free ways showing you how to fade in and fade out audio on Premiere Pro! With this post, you can now add the audio transition effect you envisioned for your video clip! If you feel like Premiere Pro is too complex and expensive for you, you can use the 4Easysoft Total Video Converter tool as an alternative! With this tool’s straightforward ways of fading in and out audio, you can quickly and efficiently add your desired audio transition effects!
100% Secure
100% Secure