Recover deleted/lost data from PC/Mac, HDD, USB, SD card and more.

Everything You Need to Know About the Camera on iPhone

Posted by Paula Pailaga to Solutions/Tips Jan 09, 2026
The Camera on iPhone has evolved so much today. You can capture stunning photos and professional-quality videos on iPhone with ease. Want to know more about iPhone camera? Read this article to learn iPhone camera app and settings. By the end, you can make the most of your iPhone camera.
Guide List
iPhone Camera Settings for High-Quality Photos Unique Features of the iPhone Camera How to Use the iPhone Camera Timer for Night Shots or Selfies Transfer iPhone Camera Photos to Windows/MaciPhone Camera Settings for High-Quality Photos
Before going to the specific features, learn how you can optimize your camera settings to ensure that every photo capture better lighting and more detail. Whether they are landscapes, portraits, or simple moments, the Camera on iPhone is designed to deliver outstanding results.
Here are the iPhone Camera Settings for better quality:
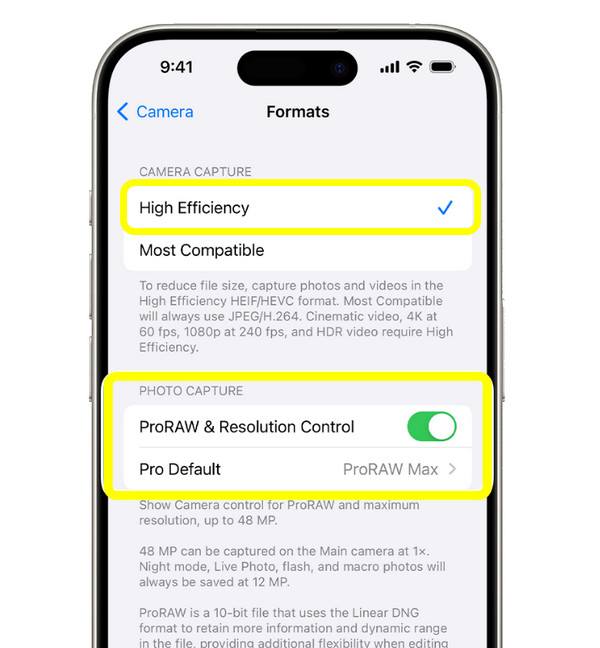
• Use the Highest Resolution. Go to "Settings", then "Camera" to "Formats", and select "High Efficiency" for better quality with smaller file sizes. You can enable "Apple ProRaw" too for maximum image detail.
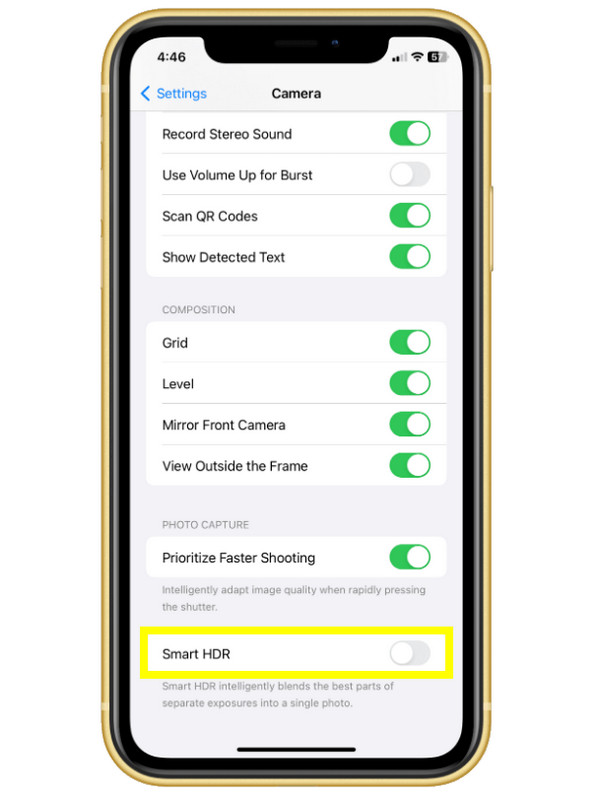
• Enable Smart HDR Turn this feature on in "Settings", then the "Camera" section. Doing so helps your pictures look more natural in bright or low-light scenes.
• Adjust Exposure Manually While shooting, tap on your screen and slide the "Exposure" icon up or down to adjust the brightness.
• Turn On the Grid and Level. Activating this option helps frame shots correctly and keep horizons straight.
• Enable Photographic Styles. Select a style (Standard, Rich Contrast, or Warm) to maintain consistent colors and tones.
Unique Features of the iPhone Camera
Moreover, the iPhone Camera app stands out due to its unique features. You can capture creative shots without needing professional equipment or lessen the need for editing apps.
Here are the things that make the iPhone Camera so special:
1. Manual Exposure and Controls. Tweak exposure and focus manually for captures where automatic settings fall short.
2. Smart HDR. It balances highlights and shadows in high-contrast scenes.
3. Night Mode. Once activated in low light, you can capture clearer images with longer exposures.
4. Live Photos. Capture photos before and after the camera shutter is pressed.
5. Burst Mode. Ideal for action shots; slide the shutter to capture a rapid series of images.
6. Quick Camera Access. Open the camera quickly from the lock screen or Control Center.
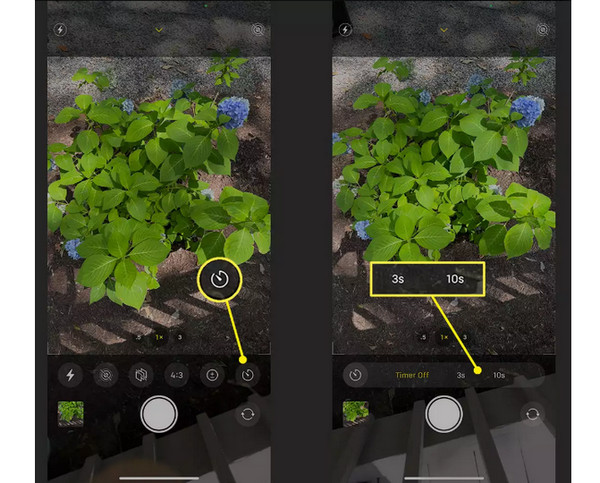
7. Camera Timer. Timer on iPhone camera lets you delay the shutter for 3 or 10 seconds, making hands-free captures easier.
8. Volume Button Shutter. The iPhone allows you to use physical Volume buttons as a camera shutter.
9. Location Services. Add GPS data to every captured picture automatically.
10. Optical and Digital Zoom. The physical lens zooms up to 3x optical, while digital zoom extends reach.
11. Aspect Ratio and File Format Options. Select how your photos are framed or saved, like HEIC, JPEG, or RAW, and pick ratios like 4:3 or 16:9 for specific uses.
12. Lens Correction. Automatically eliminate distortion from ultra-wide shots.
13. Portrait Mode with Lighting Effects. Keep the subject sharp while blurring the background.
How to Use the iPhone Camera Timer for Night Shots or Selfies
You can capture clearer night shots and well-timed selfies without causing camera shake by using iPhone camera timer. For low-light scenes, the timer gives you time to stabilize. It also assists with selfies and group pictures; it allows you to frame it properly and get into position before the shutter is pressed.
Step 1Launch the Camera app, then select the proper mode, such as Photo, Portrait, or Night mode. If you're taking a selfie, switch to the "front camera".
Step 2Then, tap the "Timer" button at the top, and there choose either "3 seconds" or "10 seconds". Place your device on any stable surface to avoid blurry photos.
Step 3You can adjust focus and exposure as needed and enable "Night mode" for night shots.
Step 4Once ready, tap the "Shutter" button and step back and position. The camera will start the countdown and take the photo. Check the photo in the "Photos" app, and make edits if needed.
Transfer iPhone Camera Photos to Windows/Mac
After all the things about the Camera on iPhone, having a reliable way to move those photos to your computer becomes essential as storage continues to grow. Rather than keeping image stores on your iPhone, safely move them using 4Easysoft iPhone Transfer. This secure and easy-to-use solution is made for transferring and managing your iPhone camera photos without risking data loss. Even if you have thousands of pictures and videos, the software can handle extensive collections with fast and stable transfer speed. From linking your device to completing the transfer, the process is straightforward and efficient.
Seamlessly transfer data between iPhone, computer, and other Apple devices.
Built-in preview feature to check photos before transferring them.
Allows you to organize, manage, and even edit iPhone data directly.
Supports multiple file types, such as photos, videos, music, and more.
100% Secure
100% Secure
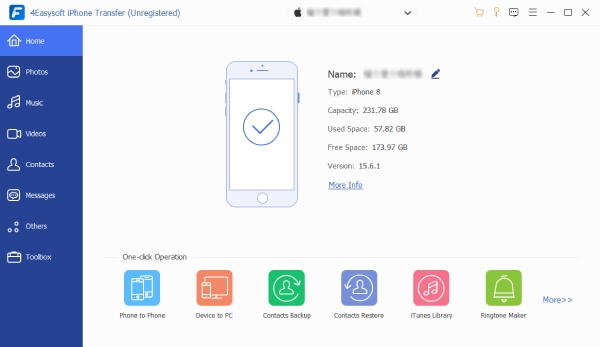
Step 1Open 4Easysoft iPhone Transfer. Plug your iPhone into this computer using a working cable. Tap "Trust" on your iPhone to confirm the connection. The program can detect your iPhone details in seconds.
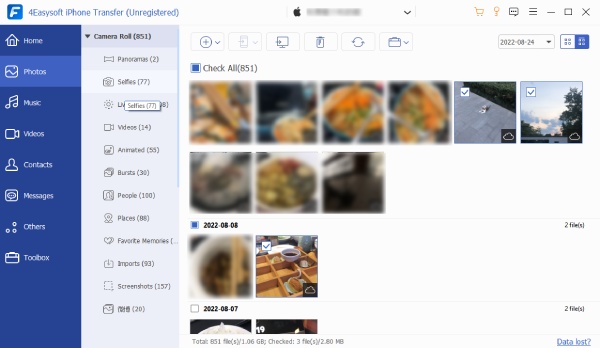
Step 2Click "Photos" in the left panel. Browse and select the images you wish to transfer. Before proceeding, you can connect a USB drive or create a secure folder on your computer where the photos will be transferred.
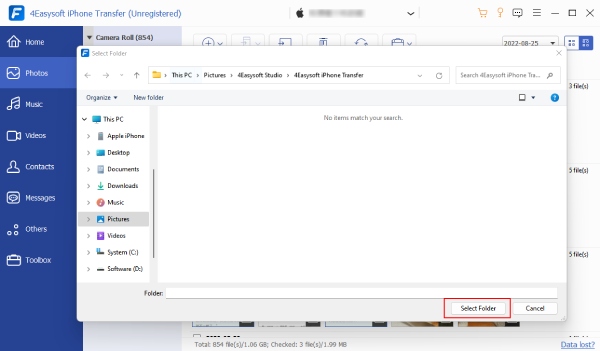
Step 3If everything is ready, click the "Export to PC" button, then pick a target destination folder. Confirm it by clicking the "Select Folder" button, and the transfer will start instantly.
Conclusion
By understanding the correct settings, exploring unique features, and learning how to use the Camera on iPhone, you can really improve your shots in any situation. Whether you want to take a selfie or low-light pictures, the camera has the flexibility for both casual and advanced users. Equally important is knowing how to transfer all captured photos and videos safely to protect your memories and help free up storage. For this, use 4Easysoft iPhone Transfer. This tool lets you move iPhone camera media to your computer smoothly, manage them with ease, and keep your data secure, all in just a few clicks. Enjoy and protect everything you capture on your iPhone!
100% Secure
100% Secure