Fix 150+ iOS system problems without data loss.
A Comprehensive Guide to the Newest StandBy Mode Feature of iOS 18/26

Posted by Paula Pailaga to iOS Recovery Mar 27, 2024
It is here! The newest iPhone version, the iOS 17/18/26! After hearing this version’s features, everybody immediately installs it on their iPhone. One of the features is the StandBy Mode. Now, this post assumes that you have already heard about it, but have you already known its background and ways to use it? If not, continue reading this post, for it features a comprehensive guide to iOS 18/26 StandBy Mode’s information on ways to use and customize it!
Guide List
Know More about iOS 17/18 Standby Mode. How to Use and Customize Standby Mode on iOS 17/18/26 Quick Fix to iOS 17/18/26 Standby Mode Not Working FAQs about iOS 17/18/26 Standby Mode on iPhone 17Know More about iOS 18/26 Standby Mode.
Before exploring this post’s simple ways to use and customize the StandBy Mode of iOS 18, you can first explore this post’s brief information about StandBy Mode. So, this iOS 17/18 StandBy Mode feature transforms your iPhone screen into an eye-catching yet functional display while charging. Those displays are widgets that allow you to glance into something valuable without needing to unlock your device.
What widgets are supported by the iOS 17’s StandBy Mode feature? Well, there are a lot of widgets that this feature supports. These features include Widgets Stacks, a Clock Display, an Alarm Clock, Weather, a Photo Display, a Display for Upcoming Calls, Live Activities, Siri, and Large Boxes of Notifications.
Now, you might ask, "What are the benefits of this StandBy Mode of iOS 17/18/26?" As mentioned above, this feature lets you glance at various information on your iPhone screen without unlocking your device. Also, its design and overall looks add spice to your information-glancing experience.
Other than that, this iOS 18’s StandBy Mode feature also offers the same benefit as Low Power Mode. Low Power Mode conserves power and improves the device’s battery life; the same goes for the StandBy Mode feature. StandBy Mode helps extend battery life and optimizes power consumption by minimizing various processes, reducing network activities, and modifying display settings. The difference is that StandBy Mode automatically runs once you charge it, while Low Power Mode can be enabled or disabled.
How to Use and Customize Standby Mode on iOS 17/18/26
Now that you have a brief background about the StandBy Mode of iOS 17/18/26, it is time to explore how to use and customize it based on your preferences. Explore this post’s featured ways below!
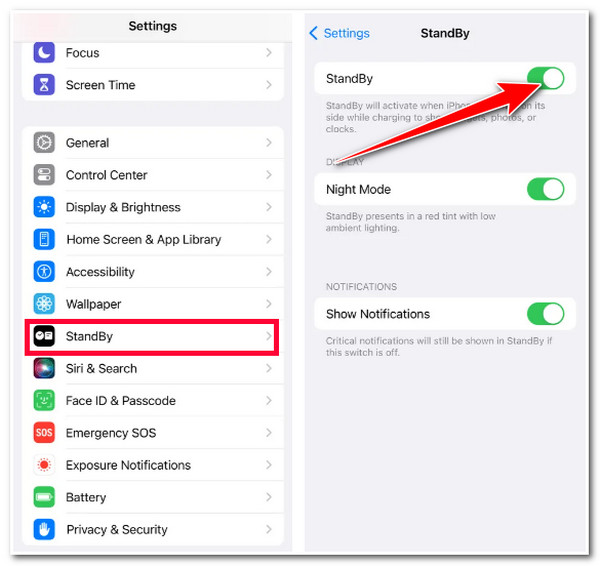
The iOS 18’s StandBy Mode feature is enabled by default, but you still need to check whether it is enabled or disabled. To do this, here are the steps showing you how to use StandBy Mode iOS 18:
Step 1Launch your Settings app on your iPhone, scroll down, access the "StandBy" option, and see whether its corresponding "Switch" button is toggled on.
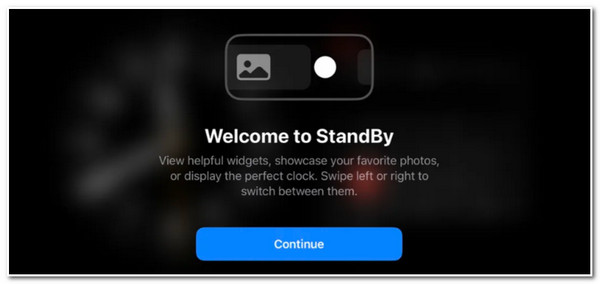
Step 2To start running your StandBy Mode, charge your iPhone, put it on a landscape orientation while standing upright, and keep it stationary.
Step 3Then, wait a few seconds and press the "Continue" button. You can swipe from left to right to switch between widgets, images, and clock displays.
Step 4Once you have decided which display you will use, scroll down to access the sub-options.
Now, to customize the Widget View, Photo View, and Clock View of StandBy Mode of iOS 17/18/26, here are the steps you need to follow:
To customize the iOS 17/18/26 StandBy Mode’s Widget View, press either the "Clock" or "Calendar" display (which are the widget stacks) and unlock your iPhone. After that, tap the "Add" button at the upper left side of the screen to add a widget, or if you want to remove it, tap the "Minus" button. After that, the rest of the work, especially choosing your preferred widget display, will depend on you.

To customize the StandBy Mode of iOS 18’s Photo View, long press the middle of the screen, tap the "Add" button, and select an "album" to display. Your device can also show the featured photos you have on your "For You" tab.

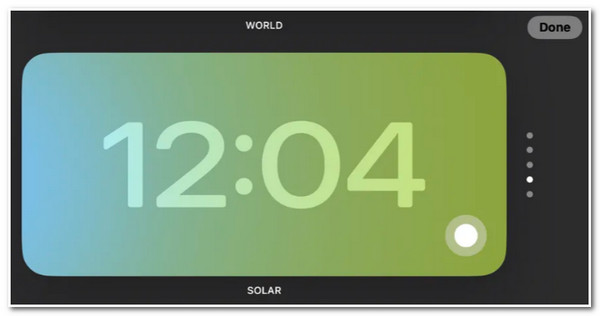
Lastly, to customize the iOS 17/18/26 StandBy Mode’s Clock View, swipe up and down to access different styles of the clock view. Then, after choosing a style, long-press the middle of the screen to see the additional customization options. After that, tap the white circle icon at the screen’s lower right corner to modify the clock style’s color.
Quick Fix to iOS 17/18/26 Standby Mode Not Working
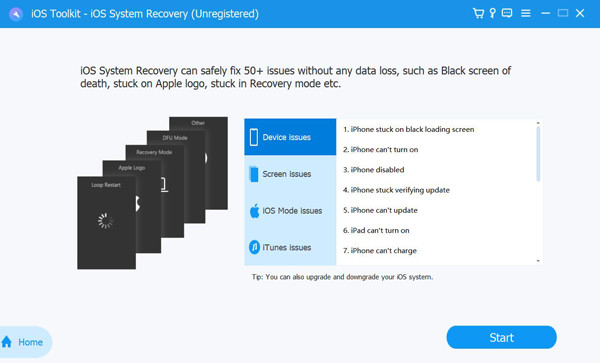
That’s it! That’s the iOS 17/18/26 StandBy Mode comprehensive information, ways to use and customize it. Now, there are a lot of adverse reports that this iOS 17/18/26 version is problematic, and some of its features, including StandBy Mode, are not working. If you are also experiencing the StandBy Mode issue, then you can use the 4Easysoft iOS System Recovery tool to fix it! This tool can quickly and efficiently fix 50+ iOS system problems, including iOS 18 StandBy Mode issues. It can fix the issue with just a few clicks and bring it to its regular operation without any data loss. If you have experienced many problems already with the iOS 18 version, you can use this tool to change its version and replace it with a perfect new system. So, without any further delay, start using this tool to fix StandBy Mode not working in iOS 18!

2 repairing modes to fix all problems like StandBy mode not working with no data loss.
Download a firmware package that lets you upgrade or downgrade your iPhone version.
Scan all information and data of your iPhone but not saving to protect your privacy.
Support all iPhone models and versions, including the latest iPhone 17 with iOS 18.
100% Secure
100% Secure
How to Quickly Fix iOS 18 Standby Mode Not Working using 4Easysoft iOS System Recovery:
Step 1Download and install the 4Easysoft iOS System Recovery tool on your computer. Next, launch the tool and connect your iPhone to the computer via a USB cable. After that, click the "Start" button to initiate the detecting process.
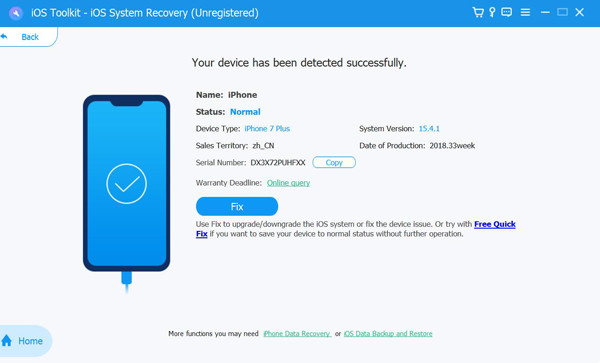
Step 2Next, the tool will automatically display all the information about your device; click the "Fix" button to do further fixes and to process to the next step.
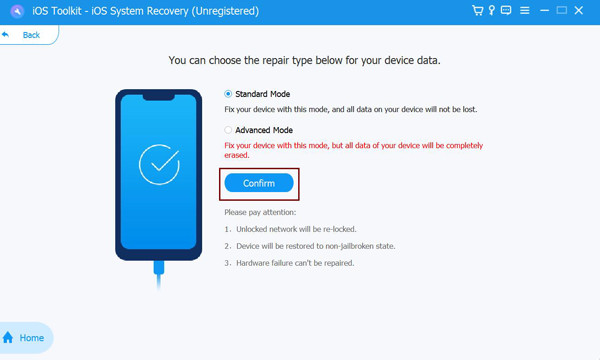
Step 3After that, read the two modes' abilities written on the tool’s interface. Then, choose the mode that will help you fix the issue and click the "Confirm" button.
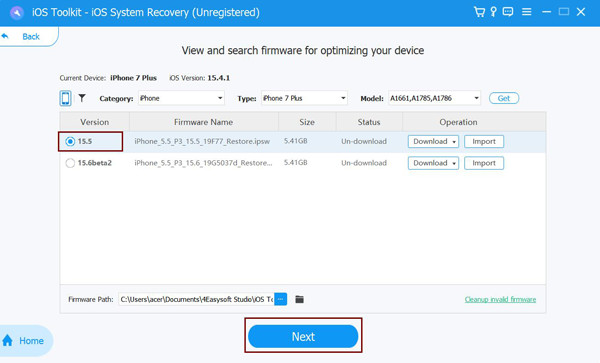
Step 4Then, select the appropriate Category, Type, and Model of your device. After that, choose your desired "firmware" with different "OS" versions and click the "Download" button. Once the downloading process is complete, click the "Next" button to fix the issue.
FAQs about iOS 18 Standby Mode on iPhone 17
-
Does the iOS 17/18/26 StandBy Mode also work with wireless charging?
Yes, StandBy Mode is working with wireless charging. It is perfectly working with wired, wireless Qi, and MagSafe. Just ensure that your iPhone is positioned in a landscape orientation.
-
Does the StandBy Mode of iOS 17/18/26 affect the device battery?
Yes, but it will not affect your device’s battery negatively. StandBy Mode can extend the battery life of your device. It minimizes various activities running in the background and other settings on your device.
-
How long does the iOS 17/18/26 StandBy Mode stay active?
There’s no exact time on how long the StandBy Mode will stay active. StandBy Mode will last as long as your device is charging and positioned in a landscape orientation.
Conclusion
There you have it! That’s the comprehensive guide to iOS 17/18/26 StandBy Mode’s background information, steps to use, and customize it. Having this valuable information, you can start using your iPhone’s StandBy Mode and customize it based on your preferences! If your iOS 18’s StandBy Mode is not working, you can use the 4Easysoft iOS System Recovery tool to fix it! With this tool’s advanced issue-scanning and system recovery capabilities, you can fix the iOS 17/18/26 StandBy Mode’s issue quickly and efficiently!
100% Secure
100% Secure