Reliable video converter, editor, and compressor for daily tasks.
Detailed Guide on How to Stabilize Videos in Premiere Pro

Posted by Aira Lesly Escoto to Edit Video/Audio Sep 19, 2025
Shaky footage ruining your perfect video content? Don't let camera vibrations compromise your video quality. You can use the professional Adobe Premiere Pro to stabilize your videos in 2 ways. Whether you want to use the built-in Warp Stabilizer easily, or install advanced plugins with more precise controls, follow this article with detailed guide. But stabilizing videos in Premiere Pro is relatively complex and resource-intensive. Thus, you can also learn an alternative way for quick and effortless stabilization without the steep learning curve. Keep reading to transform your shaky clips into buttery-smooth masterpieces!
Guide List
How to Stabilize Videos in Premiere with Warp Stabilizer Use BCC Optical Stabilizer Plugin to Stabilize Videos in Premiere The Best Premiere Pro Alternative Way to Stabilize Videos 4 Useful Tips to Capture Videos in Less ShakyHow to Stabilize Videos in Premiere with Warp Stabilizer
It's easy to use the built-in Warp Stabilizer in Adobe Premiere Pro to stabilize shaky videos directly. No need to install additional software, you can use this effect to edit your footage. This powerful tool automatically analyzes your clip and applies smoothing algorithms that work particularly well for moderate camera shake and general stabilization needs. Moreover, the advanced users can manually adjust the parameters when the automation can't meet your needs. However, the effect may require significant rendering time, especially for longer clips or higher resolution footage. Thus, it a somewhat unpredictable solution to stabilize videos in Premiere Pro for critical projects.
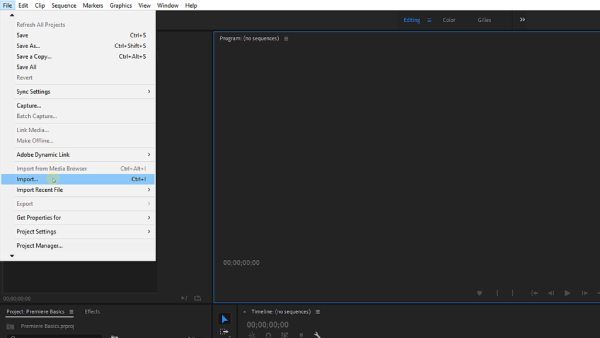
Step 1Download and launch Premiere Pro on Windows/Mac. Click the "File" menu and then "Import…" button to add your shaky videos. Then, you can easily drag and drop the desired clips into the timeline to stabilize.
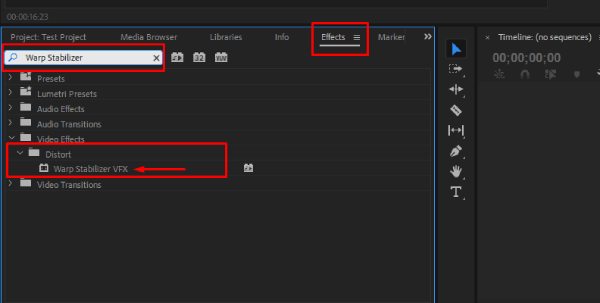
Step 2From the timeline sequence, select the shaky footage first. Then, find the "Effects" panel from the left side. Scroll down to click the "Distort" file and choose the "Warp Stabilizer VFX" effect. You can also search for it from the searching box.
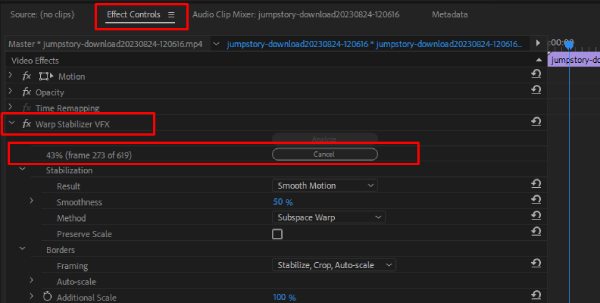
Step 3Drag and drop the "Warp Stabilizer VFX" effect over the desired timeline sequence to stabilize videos in Premiere Pro. It will start rendering automatically for few minutes, and you can check the effect first.
Step 4If you are not satisfied, you can further change the detailed parameters. Adjust the frame to check the effect in the preview window until you fix the shaky videos.
Use BCC Optical Stabilizer Plugin to Stabilize Videos in Premiere
If you are professionals that want a more advanced stabilization capability, you can install the Boris Continuum Complete (BCC) Optical Stabilizer plugin to stabilize videos in Premiere Pro editing software. It delivers superior stabilization results through advanced optical flow technology, and it can even handle severe camera shake and complex motion patterns. This plugin also offers granular control over every aspect of the stabilization process with specialized parameters for different types of camera movement and vibration. But you need to purchase the entire BCC plugin suite, representing a significant investment beyond Premiere Pro itself. Moreover, it requires more technical understanding than the built-in effect to stabilize videos in Premiere Pro. It's most suitable for professional editors working on high-budget projects.
Step 1Firstly, download and install BCC Optical Stabilizer plugin in Premiere Pro. Then, you should add files and create project with the same steps.
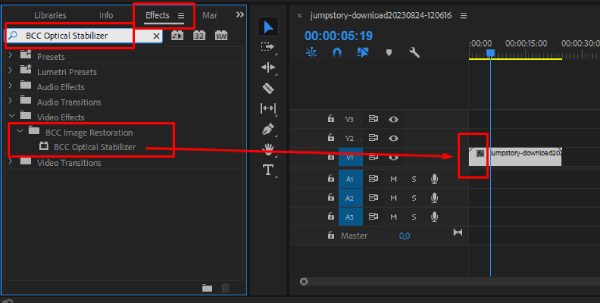
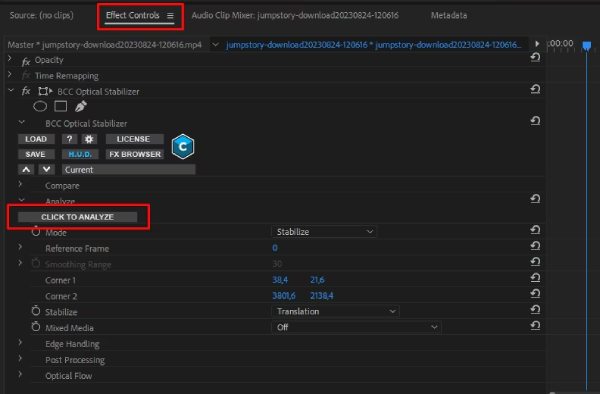
Step 2Click the "Effects" panel and search for the "BCC Optical Stabilizer" effect. Drag it over the footage in the timeline to apply the effect and stabilize videos in Premiere Pro.
Step 3Unlike Warp Stabilizer, it will not automatically start rendering. Thus, you should click the "Effects Controls" panel and click the "CLICK TO ANALYZE" button. Wait for a while and check the result.
The Best Premiere Pro Alternative Way to Stabilize Videos
Using Premiere Pro to stabilize videos is mainly for professionals. Thus, if you want a more user-friendly tool, try 4Easysoft Total Video Converter as the best alternative way. Without any complex settings or technical knowledge, you can use its video enhancer tool to quickly stabilize videos in one-click. Moreover, you can use it to reduce the noise, optimize the brightness, and adjust the contrast for improving videos. Although it's simple, it also provides advanced settings, powerful editing tools, and high-quality output according to your need.
Best alternative way to stabilize videos without Premiere Pro in one-click.
Able to keep high-quality output by adjusting the frame rate, resolution, etc.
Further improve shaky videos with video upscaler and color optimizer.
Additional editing features to trim, crop, rotate, and apply effects on videos.
100% Secure
100% Secure
Step 1Launch 4Easysoft Total Video Converter and click the "Toolbox" button to access to 15+ toolkits. Find the "Video Enhancer" feature here and click the "Add" button to upload the shaky videos.
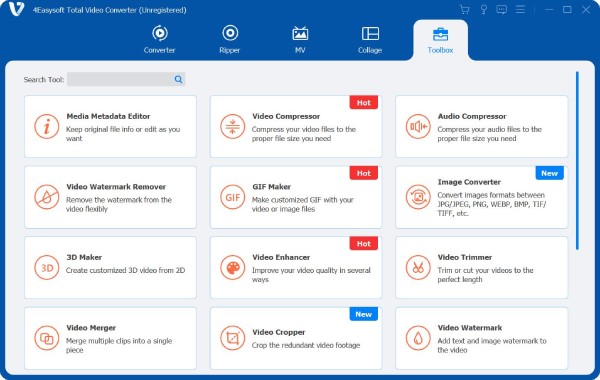
Step 2In the popping-up windows, tick the "Reduce Video Shaking" button to automatically stabilize videos without Premiere Pro. You can also upscale videos to 4K or remove noise. At last, click the "Enhance" button.

4 Useful Tips to Capture Videos with Less Shakiness
While post-production stabilization can rescue shaky footage, preventing camera shake during recording yields the best results:
1. Use Proper Stabilization Equipment: Invest in a quality tripod, gimbal, or stabilizer for smooth shooting. Even budget-friendly options significantly reduce camera shake compared to handheld shooting.
2. Employ Camera Technique: Hold your camera properly with both hands, keeping your elbows close to your body. Move slowly and deliberately when panning or following action.
3. Utilize In-Camera Stabilization: Enable your camera's or smartphone's built-in stabilization features (OIS or EIS) when available. These systems work in real-time to reduce minor vibrations during recording.
4. Apply the "Wide and Tight" Approach: Shoot wider than your final frame requires, providing extra margin for stabilization cropping. This preserves more image quality during the stabilization process.
Conclusion
There are 2 professional ways to stabilize shaky video in Premiere Pro. Whether you use the native Warp Stabilizer or advanced third-party plugins like BCC Optical Stabilizer, you need to adjust the parameters further. Thus, these solutions often require significant technical knowledge, processing time, and financial investment. For editors and creators seeking a more accessible approach, 4Easysoft Total Video Converter provides an excellent alternative way to stabilize videos without Premiere Pro. By combining proper shooting techniques with the right post-production tools, you can ensure your videos always appear smooth and professional.
100% Secure
100% Secure