Recover deleted/lost data from PC/Mac, HDD, USB, SD card and more.

How to Fix iPhone Cannot Verify Server Identity Easily

Posted by Alvin Cantero to iOS Recovery Nov 21, 2025
When your iPhone suddenly displays a "Server Identity Could Not Be Verified" warning, it interrupts your current activity and may raise concerns about your device's security. Be sure to keep reading this article, as this post will tell the causes and provide practical solutions to fix this issue without data loss, all through simple steps.
Guide List
Why can’t the iPhone Verify the Server Identity? Use a Professional Tool to Fix Can’t Verify the Server Identity Check Date and Time Settings to Guarantee Validity Clear Safari Data to Re-verify Certificates Reset Network Configuration to Clear Interference Data Re-add the Email Account to Refresh SSL Update iOS System to Fix Server Verification Failure Force Restart iPhone to Clear the Temporary Memory Disable SSL to Bypass Verification and Add CertificatesWhy can’t the iPhone Verify the Server Identity?
Server Certificate Issues: The certificate may be expired, invalid, revoked, untrusted by the device, or self-signed.
Device Configuration Errors: Incorrect system time or outdated iOS versions can disrupt certificate validation mechanisms.
Network Security Interventions: Proxy servers or VPNs may interfere with SSL processes, while unstable network connections can also cause validation failures.
Man-in-the-Middle Attack Risks: Malicious third parties may attempt to intercept communications between the device and server.
Use a Professional Tool to Fix Can’t Verify the Server Identity
4Easysoft iOS System Recovery is a comprehensive tool designed specifically for iOS devices. It not only helps resolve the "iPhone cannot verify the server" issue but also backs up and restores important data on your iOS device. Additionally, it reliably fixes your iPhone whenever it freezes, crashes, or gets stuck on a black screen.
Capable of resolving various system issues, including black screens and recovery mode.
Supports advance backup of all device data to prevent loss.
Conveniently manages multimedia files on iOS devices.
The intuitive operation process allows even inexperienced users to master it effortlessly.
100% Secure
100% Secure
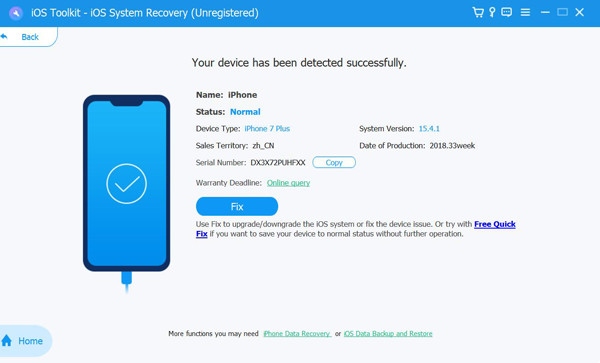
Step 1Connect your iPhone to your computer. After launching the program, click Start, then click the "Fix" button to proceed with further repairs.
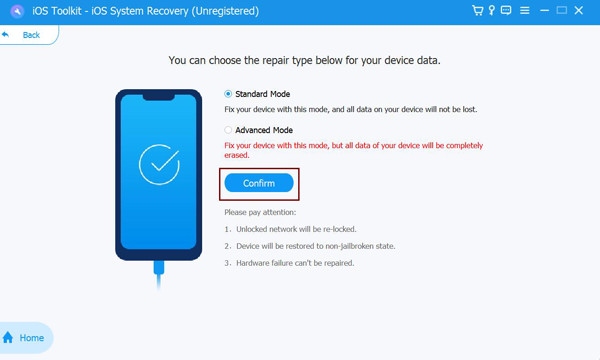
Step 2The program will display available repair modes. Select the mode that suits your needs, along with the correct category, type, and model of your device.
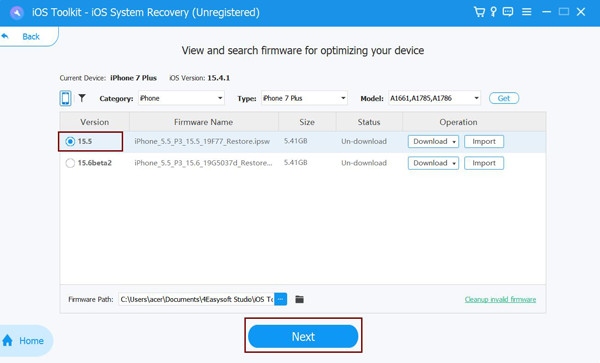
Step 3Then follow the prompts to download the necessary firmware files. Click "Next" to begin the repair process.
Check Date and Time Settings to Guarantee Validity
Server certificate validation relies on accurate system time. If your device's date and time settings are incorrect, it may cause certificate validation to fail. In such cases, you can check your iPhone's date and time settings to resolve issues with server validation.
Step 1Open Settings, tap "General", then tap "Date & Time". Ensure the "Set Automatically" option is turned on.
Step 2If it's already on but the time is still incorrect, turn off automatic settings, adjust manually, then turn it back on.

Clear Safari Data to Re-verify Certificates
By clearing the browser cache, history, and website-related certificate information stored on your device, your iPhone will download the latest SSL/TLS certificates when you next visit or connect to a server. Often, system errors occur because Safari or iOS has cached expired, corrupted, or conflicting certificates, preventing email or websites from properly verifying the server's identity.
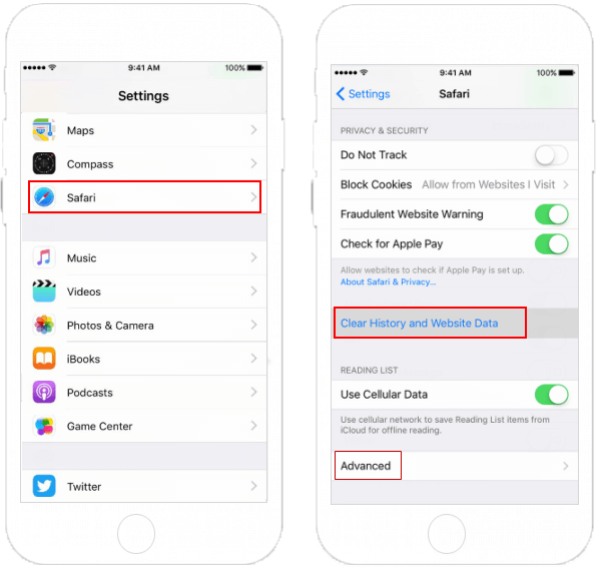
Step 1Open the Settings app, scroll to find and tap "Safari". Go to "Advanced", then tap "Website Data".
Step 2Tap "Clear History and Website Data". In the confirmation window that appears, select "Clear History and Data".
Step 3After the operation is completed, reopen your email or the corresponding website to allow your iPhone to re-verify the server certificate.
Reset Network Configuration to Clear Interference Data
Resetting network settings may also resolve cached data or misconfigurations within network settings that could interfere with the SSL/TLS handshake process. This reset clears such temporary data, thereby fixing persistent issues where the iPhone fails to verify the server.
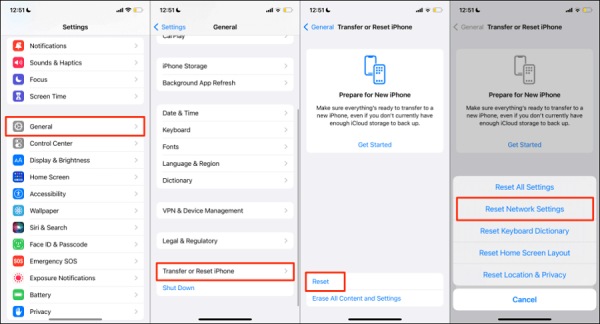
Step 1Tap "Settings," then locate "General" and "Transfer or Reset iPhone". Tap the "Reset" button, then select "Reset Network Settings" from the pop-up menu.
Step 2Enter your device passcode to confirm the action. After restarting, the device will automatically restore default network settings.
Re-add the Email Account to Refresh SSL
Sometimes, removing your email account from your iPhone and re-adding it can also resolve the "Unable to verify server identity" issue. The Mail app is a common source of this error, and re-adding the account refreshes the SSL handshake process and certificate verification.
Step 1Open Settings, then "Mail". Tap "Accounts", select the problematic email account, and choose "Delete Account".
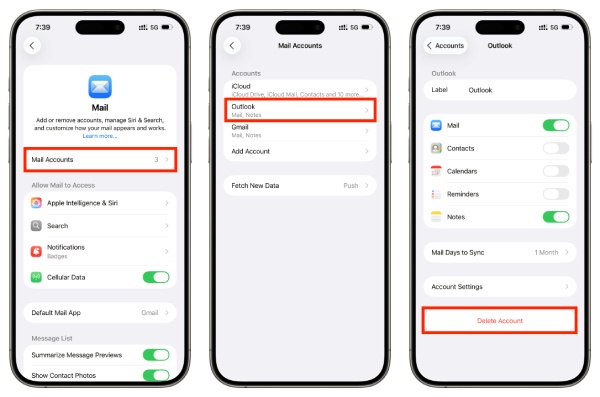
Step 2Return to the account list, select "Add Account," and re-enter the account information. After saving the settings, check if the issue is resolved.
Update iOS System to Fix Server Verification Failure
The iOS update includes the latest security patches and trust certificate store updates. Installing the newest system version released by Apple will resolve known SSL/TLS validation errors.
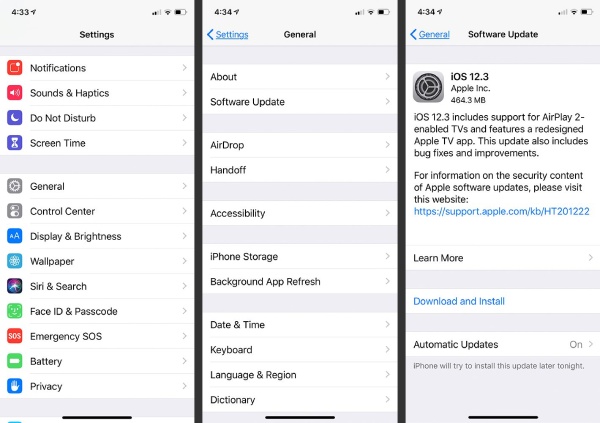
Step 1Connect to a Wi-Fi network and ensure your device has sufficient battery power. Open Settings, go to General, and locate Software Update.
Step 2If an update is available, tap Download and Install. Your device will restart automatically after installation completes.
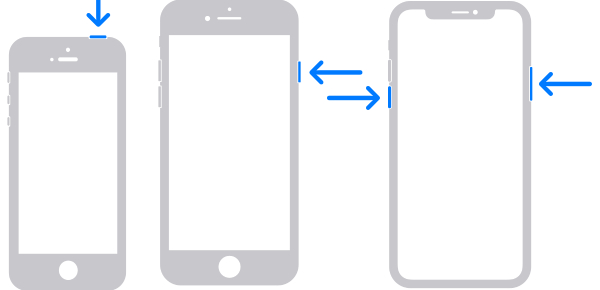
Force Restart iPhone to Clear the Temporary Memory
If none of the above methods resolve the issue, you can force restart your iPhone. A force restart clears temporary memory and suspended processes, resolving temporary software glitches that may cause SSL verification failures.
iPhone 5 and earlier models:
Step sPress and hold the top button until you see the "Power Off" slider. Drag the slider to turn off your iPhone.
iPhone 6/7/8:
Step 1Press and hold the side button until you see the "Slide to power off" slider. Drag the slider to turn off your iPhone.
Step 2Press and hold the side button again until the Apple logo appears to turn on your iPhone.
iPhone X and later models:
Step 1Press and hold the Volume Down button and the Side button simultaneously until the "Slide to power off" slider appears.
Step 2Drag the slider to turn off your iPhone. Press and hold the Side button until the Apple logo appears to turn it back on.
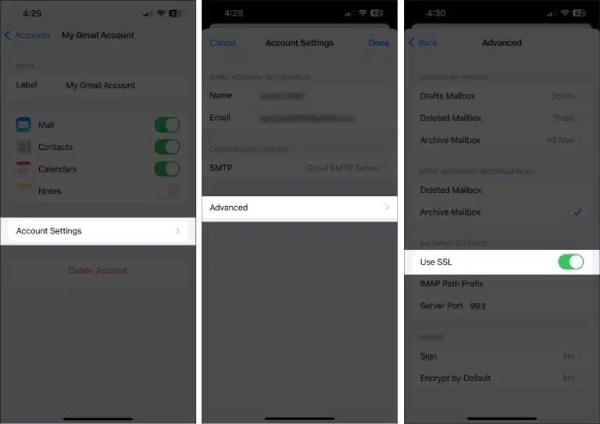
Disable SSL to Bypass Verification and Add Certificates
As a last resort, you can try disabling SSL. Since turning off SSL reduces security, this method should only be attempted if none of the above solutions work. This approach bypasses the system's certificate security checks, allowing your iPhone to connect to mail servers or other services temporarily. You'll need to manually add or trust the server certificate to maintain the connection.
Step 1Open Settings, go to "Mail", and tap "Accounts". Select the problematic email account.
Step 2Tap "Account" to re-enter the account details. Scroll to the bottom or tap "Advanced". Locate the Use SSL toggle switch and turn it off.
Step 3Return to the previous level, save changes, and exit. Attempt to reconnect the email account to see if sending and receiving messages is now successful.
Conclusion
The "Unable to verify server identity" error on iPhones can typically be resolved using system repair tools or simple settings adjustments. You can start with the simplest step—checking the date and time—and try different methods one by one. Alternatively, you can opt for a straightforward and effective solution by using professional tools like 4Easysoft iOS System Recovery. This provides a more comprehensive fix when simpler methods fail, while ensuring your data remains secure.
100% Secure
100% Secure