Completely scan your iOS devices and delete all junk files on your iPhone, iPad, and iPod.
How to Deactivate Facebook on iPhone and Delete it Forever?

Posted by Alvin Cantero to iOS Cleaner Dec 05, 2025
There will be times when you want to take a break from social media, like Facebook. So, knowing how to deactivate Facebook on iPhone, perhaps delete it, is essential. Doing so will let you step away temporarily from your account, and deleting it will completely remove your account. How? In this post, learn how to deactivate and permanently delete Facebook on iPhone, depending on what you need. You'll also see helpful tips before taking the final step.
Guide List
How to Deactivate Facebook on Android or iPhone How to Permanently Delete a Facebook Account on iPhone Tips for Permanently Deleting Your Facebook Account How to Completely Clear Facebook Data on Your Phone (Recommend our product here)How to Deactivate Facebook on Android or iPhone
Instead of deciding to delete your account entirely, you might want to deactivate your Facebook account temporarily. This option allows you to take a break from Facebook without completely losing your posts, photos, or friends. Your Facebook profile is hidden from others. But you can reactivate it and sign in again anytime without losing data.
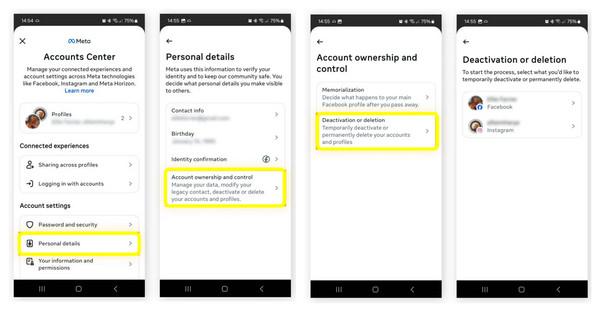
Step 1Open the "Facebook" app. Tap the "three-line" menu, and head to "Settings & Privacy", then tap "Settings".
Step 2Scroll down and look for "See More in the Accounts Center". There, choose "Personal Details", and select "Account ownership and Control". Tap "Deactivation or Deletion", then select "Deactivate Account".
Step 3Tap "Continue to Account Deactivation", follow the on-screen instructions, and confirm the to disable the Facebook account.
How to Permanently Delete a Facebook Account on iPhone
If you have decided to leave Facebook, besides deactivating your account, you can permanently delete it from your iPhone. Unlike deactivation, deletion will remove all your data, such as posts, photos, messages, and friends, and you will not be able to restore it. So, if you wish to delete Facebook account, it's nice if you download a copy of it. By the way, you can sync Facebook contacts for backups in advance.
See below the steps to delete Facebook account on iPhone:
Step 1Tap the "three-line" icon on the Facebook app. Tap "Settings & Privacy", and then tap "Settings".
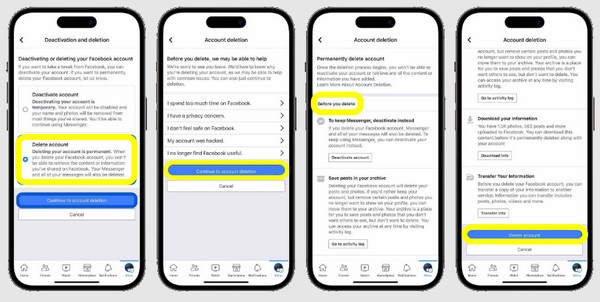
Step 2There, tap "See More in Accounts Center"; go to "Personal Details" and choose "Account Ownership and Control". Next, select "Deactivation or Deletion", then select "Delete Account".
Step 3Tap "Continue to Account Deletion" and complete the prompts. Confirm the action by entering your password.
Tips for Permanently Deleting Your Facebook Account
After knowing how to deactivate Facebook on iPhone and how to delete it, take note that doing so is a big decision, especially when deleting it permanently. Make sure to save important photos, contacts, or messages, since you will not be able to restore them later. The success rate of recovering deleted Facebook videos is pretty low after days and even weeks.
• Download data. Select "Download Your Information" in Settings to save copies of photos, posts, and messages.
• Unlink connected apps. Check which applications or websites have your Facebook login; please disconnect them.
• Sign out of all devices. Ensure you have logged out of every device where your account is active.
How to Completely Clear Facebook Data on Your Phone (Recommend our product here)
Before you say goodbye to Facebook, you want to ensure that you have cleared every trace of it from your iPhone. Simply deleting Facebook on iPhone does not clear its stored cache, which eats up your storage space. For this, you need 4Easysoft iPhone Cleaner. It can delete app data caches, junk files, and even personal files on iPhone permanently. No hidden files remain. Those deleted iPhone files are unrecoverable. On top of that, it is user-friendly and does not need any technical know-how, just a few clicks to clear Facebook data and everything.
Erases Facebook data, caches, and more completely and securely.
Eliminates junk files, large files, and temporary data to free up space.
Offers different cleaning modes for basic or deep erasure.
Support the latest iPhone 17 and iOS 26.
100% Secure
100% Secure
Step 1Launch 4Easysoft iPhone Cleaner on your computer. Pair your iPhone with your computer via a USB cable, and tap "Trust" when prompted on your device.
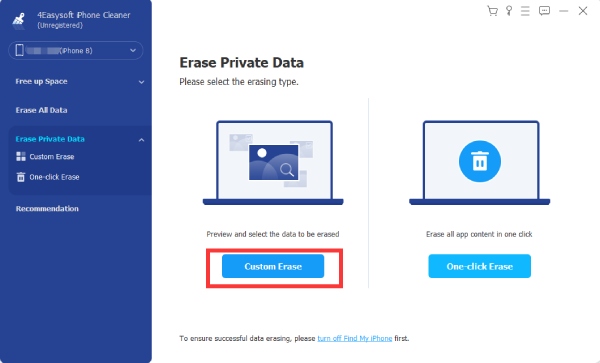
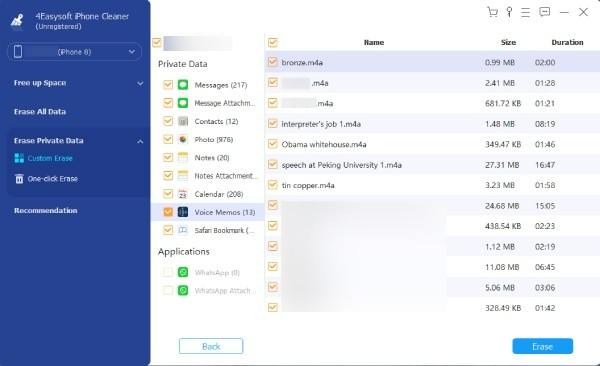
Step 2Once the program detects your iPhone, click the "Erase Private Data" from the main menu. In this page, select "Custom Erase". The tool will start scanning your device for stored app data, including Facebook cache, messages, login details, and history.
Otherwise, you can aim for "One-click Erase". Here, you'll see categories instead of the complete private data. Click the ones you want to remove, such as "Facebook" under Applications.
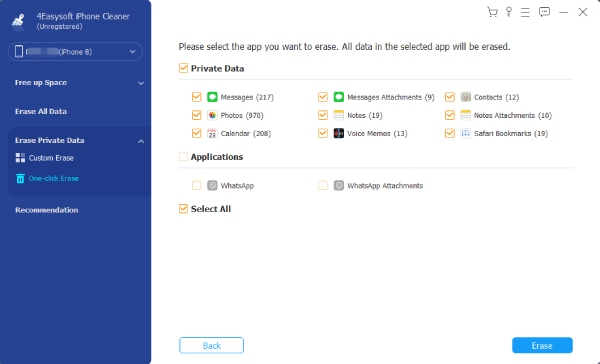
Step 3Choose all the data you want to remove and click the checkbox beside it. After everything, click the "Erase" button to remove all successfully.
Conclusion
It is a personal decision to deactivate or delete Facebook on iPhone. Whether you want to take a break from social media or wish to remove your online presence on Facebook entirely, with the ways mentioned above, you can easily manage your Facebook account here and there. However, once you have deleted or deactivated your account, there may still be leftovers. So, to ensure a complete cleanup, use 4Easysoft iPhone Cleaner to erase everything, from app data and cache to browsing history, keeping your storage clean and more space. With just a few clicks, you can give your device a fresh start!
100% Secure
100% Secure