Reliable video converter, editor, and compressor for daily tasks.
Complete Manual on How to Edit QuickTime Video on Windows and Mac

Posted by Aira Lesly Escoto to Edit Video/Audio Jun 12, 2025
Windows users probably love QuickTime for its simple recording and playing features, but when it comes to editing, knowing where to start can be a challenge. Therefore, if you are searching for how to edit a QuickTime video, this guide is aimed to help you learn about all the options available to you. Each section will guide you on how to edit QuickTime video via the default tool of QuickTime Player, the advanced video editors, such as 4Easysoft Total Video Converter, and free editing tools like iMovie and Windows Movie Maker. We will also share simple steps and recommendations for Mac and Windows users. So, let’s examine how to edit your QuickTime videos smoothly and professionally!
Comparison of the 4 Methods to Edit Quicktime Videos
| Method | Best for/ Special Features |
| QuickTime Player (Default Way) | It is best for simple edits like trimming and splitting without extra software. |
| 4Easysoft Total Video Converter (Professional Way) | A powerful tool for advanced editing, converting formats, and enhancing video quality. |
| iMovie on Mac | Great for Mac users who want to add transitions, effects, and background music easily. |
| Windows Movie Maker | A free option for Windows users to perform basic edits like cutting and adding effects. |
Guide List
Default Way to Edit QuickTime Video with The Player Itself Professional Way to Edit QuickTime Video on Windows/Mac How to Edit QuickTime Videos in iMovie on Mac [Steps] Use Windows Movie Maker to Edit QuickTime Videos on WindowsDefault Way to Edit QuickTime Video with The Player Itself
If you require a way to make simple adjustments to your QuickTime videos without installing third-party tools, QuickTime Player can get you booked on basic editing. QuickTime is a built-in solution on your Mac.
Steps to Edit QuickTime Videos with QuickTime Player
Step 1Look for the QuickTime video file on your Mac. Then, right-click the file and click Open File, then QuickTime Player.

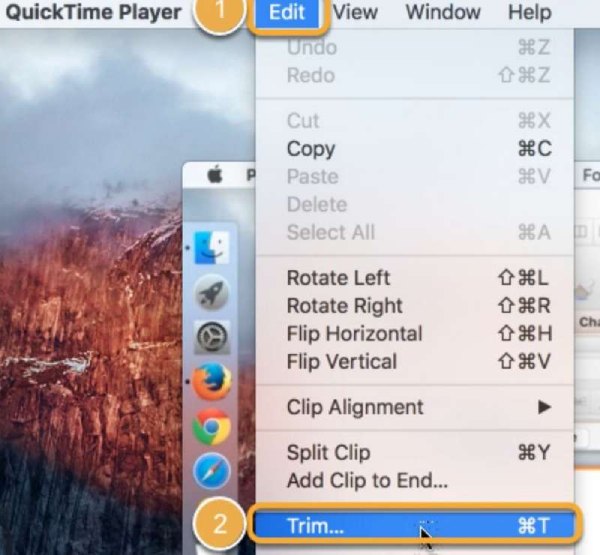
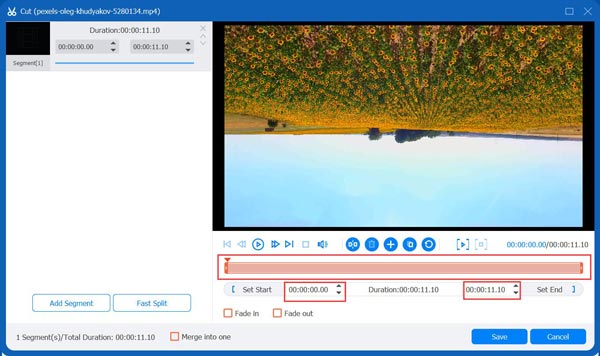
Step 2Pick Trim from the Edit menu. At the bottom, a yellow trimming bar will be on top of it.
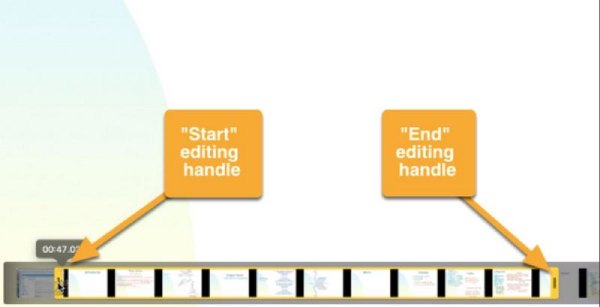
Step 3Click and drag on the endpoints to define the section you want to keep. Hit Trim to delete the unwanted parts.
Step 4When you are happy with the edits, you can go to the tab and select Save or Export As to save your video. Select the desired file quality and destination.

QuickTime Player makes it easy to handle light video edits without diving into complex software. If you want to know how to edit videos with QuickTime Player quickly and easily, this method is your go-to solution!
Professional Way to Edit QuickTime Video on Windows/Mac
To improve your QuickTime videos further the usual trim and cut, you can use the 4Easysoft Total Video Converter, a tool that equips skilled features. This software is an all-in-one video editor and converter that supports QuickTime MOV files and enables advanced editing, such as effects, cropping, rotation, subtitles, etc. This tool is ideal for creating polished work, school, or social media videos if you've been searching for how to edit QuickTime videos more professionally and efficiently.
Trim, split, and merge QuickTime videos with precision.
Crop and rotate videos to adjust framing and orientation.
Add filters and effects to enhance video visuals.
Supports various formats such as MP4, MOV, etc.
100% Secure
100% Secure
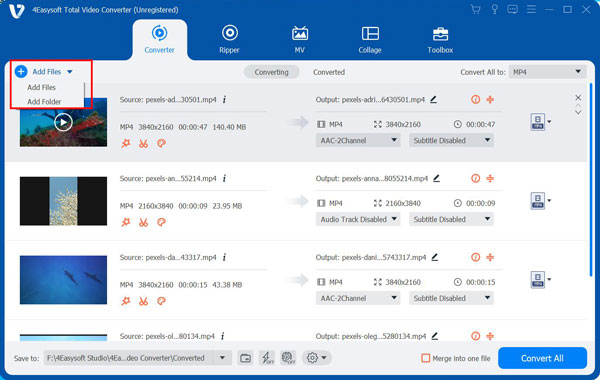
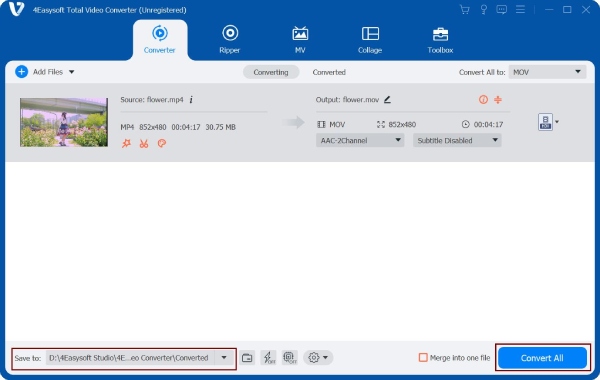
Step 1Open the app on your computer and choose the Add File to upload your video.
Step 2To import your QuickTime, click Add Files, MOV video. Videos can also be drag and drop directly into the interface.
Step 3Preview your video after editing it to appear the way you want it. Press Save to keep the editing changes.
Step 4To export and save your freshly altered video, click Convert All after choosing the preferred output format from the format dropdown.
If you want a more advanced QuickTime editing tool, particularly for precise edits (color correction, special effects, and custom watermarks), you should use 4Easysoft Total Video Converter. It has simple workflow and editing capabilities without compromising powerful features, ideal for beginners and experts.
How to Edit QuickTime Videos in iMovie on Mac [Steps]
If you are a Mac user and need a free and quick solution to edit QuickTime videos, iMovie may be one of the best choices. It has simple video editing features that allow you to insert transitions, effects, music, and more. It is pre-installed on most Mac devices. iMovie makes editing easy whether you’re a novice or want to make a high-production-value-type video. If you are wondering how to edit a QuickTime video in iMovie, here is a simple guide.
Steps to Edit QuickTime Videos in iMovie on Mac
• Launch iMovie from your Applications folder or search for it via Spotlight. Click Create New and select Movie from the dropdown to start a new project.
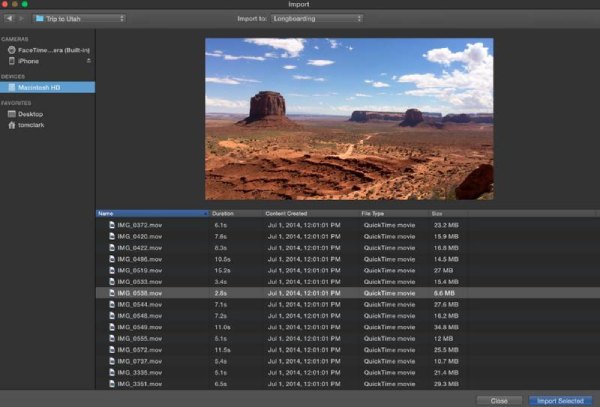
• In the iMovie workspace, click on the Import Media button. Browse and select the QuickTime (.mov) video file you want to edit. Click Import Selected to add it to your project library.
• Select the video clip in the timeline. Drag the edges to trim unwanted parts. If needed, use Command + B to split clips.
• Use the play button to preview your video in real-time and make additional adjustments. Select the Share button at the right corner. Choose File to export the video to your Mac. Select video quality and resolution, then click Next to save.
You can learn how to edit a QuickTime video in iMovie and produce high-quality videos without spending money. iMovie is perfect for introductory and intermediate video editing tasks, especially if you're working within the Apple ecosystem.
Use Windows Movie Maker to Edit QuickTime Videos on Windows
If you are a Windows user and want an easy way to edit QuickTime videos, Windows Movie Maker can still be helpful if you already have it installed. It has a gentle learning curve, with the most basic video editing features, such as trimming, cutting scenes, and adding transitions, titles, and music, making it suitable for occasional video projects. But most QuickTime videos are. MOV format. You'll need to ensure Windows Movie Maker supports your file or convert it using a compatible format like MP4 for editing.
Steps to Edit QuickTime Videos in Windows Movie Maker
• Windows Movie Maker does not support QuickTime (.MOV) files by default. Use a video converter (such as HandBrake or Any Video Converter) to convert the .MOV file to a format like .WMV, .MP4, or .AVI before importing.
• Open Windows Movie Maker and click "Add videos and photos." Select the converted video file from your computer and import it into the timeline.
• Use the editing tools to trim, split, and add transitions, effects, text, or background music. Drag and arrange clips on the timeline as needed.
• Once satisfied with your edits, click "Save movie" and choose a format suitable for your needs (e.g., MP4 for online sharing). Your video is now ready to be shared!

Conclusion
To sum up, how to edit QuickTime videos depends on what you need. If you only want basic trimming or splitting, QuickTime Player is a simple tool perfect for those asking how to edit videos with QuickTime Player. 4Easysoft Total Video Converter, iMovie, and Windows Movie Maker are great alternatives if you want something more that adds effects and transitions to your video editing. Select the editing method that suits your needs and promptly create a polished video.
100% Secure
100% Secure