Convert, edit, and compress videos/audios in 1000+ formats with high quality.
How to Use After Effects to Stabilize Shaky Videos

Posted by Aira Lesly Escoto to Edit Video/Audio Nov 21, 2025
Shaky footage can distract viewers from the main focus of a video, and After Effects offers professional solutions for addressing issues like camera shake. It provides two methods to resolve this problem. If After Effects proves too complex, this article also provides an alternative solution for your consideration.
Guide List
Use After Effects Warp Stabilizer to Stabilize Videos Stabilize Videos with Mocha AE Plugins in After Effects The Best Alternative to After Effects for Stabilizing Videos Bonus Tips for Getting Stable VideosUse After Effects Warp Stabilizer to Stabilize Videos
Warp Stabilizer is After Effects' built-in automatic video stabilization feature. It analyzes motion trajectories within the footage to reduce handheld camera shake, resulting in smoother, more stable video. It identifies different types of motion—such as panning, rotating, and zooming—and applies automatic compensation algorithms to smooth out footage. Additionally, it automatically crops and scales edge areas to prevent black borders and supports rolling shutter correction to minimize the jelly effect.
- Pros
- After Effects Auto-Complete Analysis and Stabilization, Simple Operation
- Intelligently identifies motion types with minimal misjudgment.
- Refined algorithms deliver smooth, natural footage.
- Cons
- Analysis takes time for high-resolution or long videos.
- Limited effectiveness on severe jitter.
Step 1Import the video into Adobe After Effects and select the video timeline. With the "Effects and Presets" section visible in the right panel.
Step 2Search for the "Warp Stabilizer" effect and drag it onto the timeline. This effect will analyze the video to eliminate camera shake.
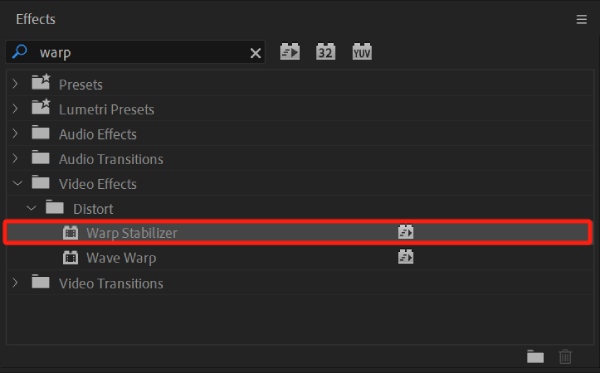
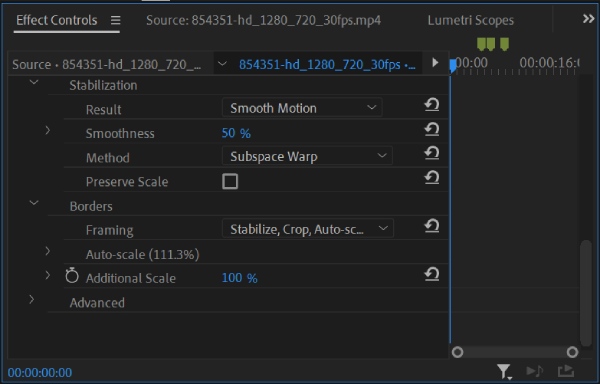
Step 3Open the "Effects Controls" panel on the left. When the "Warp Stabilizer" customization options appear, apply the desired settings.
Stabilize Videos with Mocha AE Plugins in After Effects
Mocha AE is After Effects' built-in planar tracking tool. It maintains higher precision during complex or irregular motion by tracking the movement of multiple planar areas within a scene. Mocha AE allows manual selection of specific regions for tracking, extracting precise motion data, and applying it to footage to achieve smooth stabilization effects—either locally or across the entire clip.
- Pros
- High tracking accuracy.
- Support manual control of tracking areas and keyframes, offering high flexibility.
- Cons
- Manual setup of tracking areas and parameters is required.
- The workflow is cumbersome for videos with slight shaking.
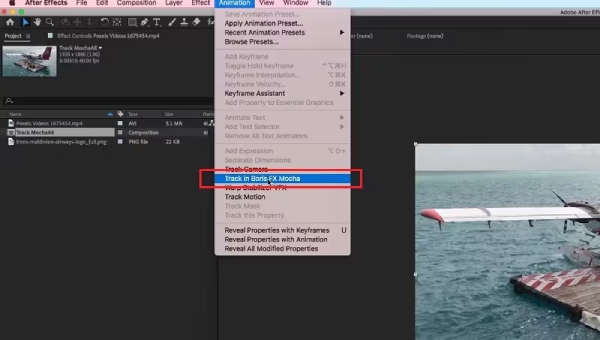
Step 1Launch After Effects, click the top toolbar to access the "Animation" menu, then enable the "Track in Boris FX Mocha" option.
Step 2Create a new tracking layer. Use the X-Spline or Bézier curve tool to draw a shape around the video area you want to track.

Step 3Next, click the "Show Surface" button in the "Basic" panel and adjust the angle to align with the plane you want to track.
Step 4Click the "Forward Track" button and wait for Mocha AE to complete the tracking process. After tracking, check the results by selecting "Show Grid" and playing the clip.

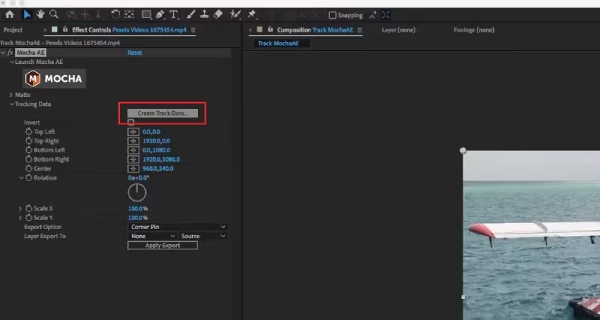
Step 5After saving the track, click the "Create Track Data" button in the After Effects interface, then select the video layer in the Layer Controls.
Step 6Drag the object you want to add from the Project Window onto the Layer Player and place it above the video layer.
The Best Alternative to After Effects for Stabilizing Videos
Methods for stabilizing videos in After Effects require a basic understanding of video editing and the software's features. For absolute beginners, 4Easysoft Total Video Converter offers a simpler alternative with equally effective results. It features a dedicated shake reduction tool that optimizes video shakiness with a single click. Plus, its integrated editing toolkit enables one-stop video effect editing.
Support multiple video format inputs and outputs, such as MOV, MKV, etc.
One-click optimization for video shaking issues, no experience required.
Built-in toolbox supports editing functions like cropping, rotating, and speed adjustment.
Real-time preview to check video optimization results, enabling immediate adjustments.
100% Secure
100% Secure
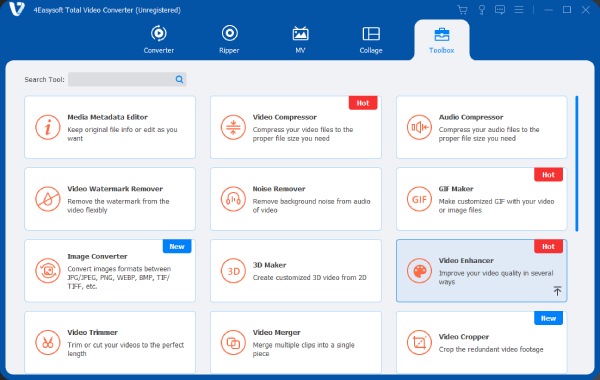
Step 1Launch the software, click "Toolbox" at the top of the interface. Find "Video Enhancer" and click "Plus" to import your video.
Step 2Choose "Reduce Video Shaking". You can also click "Cut" to edit the video and click "Output" to change the video format.
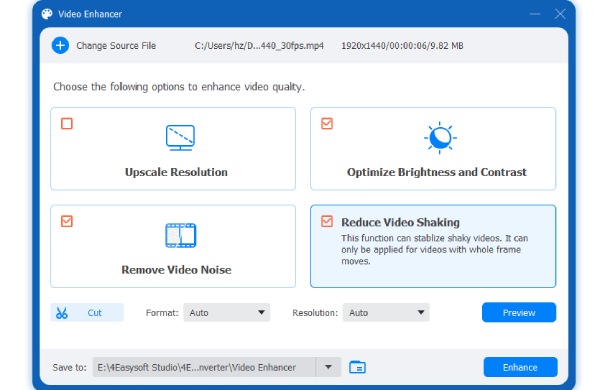
Step 3When you are satisfied with the stable effects, click "Enhance" to reduce video shaking. Then the video will automatically save to your computer.
Bonus Tips for Getting Stable Videos
Inspect Equipment and Support Tools
Use auxiliary equipment such as tripods, gimbals, and video stabilizers. Ensure all mounting hardware is securely fastened, and your phone or camera is firmly attached.
Select the appropriate lens and focal length
Avoid using telephoto lenses for handheld shots, as minor shakes will be magnified. Wide-angle lenses are easier to keep steady.
Adjust shooting parameters
Increase shutter speed (e.g., above 1/125 sec) to reduce blur. Enable the camera or phone's built-in image stabilization (OIS/EIS).
Conclusion
In short, maintaining stable footage is crucial for enhancing video quality. The two methods for achieving stabilization in After Effects described in this article are both quite professional and complex. In contrast, 4Easysoft Total Video Converter offers a more convenient alternative, allowing users to stabilize videos with a single click while also providing a wealth of editing tools. Download it now to handle shaky footage.
100% Secure
100% Secure