Convert, edit, and compress videos/audios in 1000+ formats with high quality.
How to Fix and Stabilize Videos on iPhone in Easy Steps

Posted by Aira Lesly Escoto to Edit Video/Audio Oct 15, 2025
Does shaky footage always mar your iPhone videos? Don't worry—your iPhone comes with a powerful built-in video stabilization tool. With simple settings or easy-to-use editing software, you can significantly reduce camera shake in seconds, making your videos look professional and smooth.
Guide List
Why You Need Stabilization on video and How it Works? How to Stabilize Video Using iPhone Settings and iPad A Powerful Alternative to iPhone Stabilization Settings Other Tips to Prevent Video Shake Before EditingWhy You Need Stabilization on video and How it Works?
Video shake is a common issue plaguing many mobile photographers. Even when you think you're holding steady, the final footage often ends up shaky. Understanding its root causes is the first step toward effective solutions.
• Handheld shooting: When recording without a stabilizer, even breathing and minor muscle tremors directly translate into visible shake.
• Moving shots: Filming while walking or running causes body movement to result in severe video jitter.
• Excessive Zoom: Using telephoto lenses or digital zoom amplifies hand tremors, resulting in even more unstable footage.
• Abrupt Camera Movements: Rapid pans, tilts, or sudden turns easily produce jerky shakes and blurring.
Current mainstream stabilization technologies fall into two main categories, each achieving results through different methods with distinct advantages:
Electronic Image Stabilization (EIS): This software-based solution is widely adopted in smartphones.
• How it works: Gyroscopes and other sensors detect device motion data. Algorithms then apply inverse compensation cropping to the image. It trims portions of the frame's edges, allowing the main subject to move within the frame to counteract shake.
Optical Image Stabilization (OIS): This is a hardware-based physical stabilization technology.
• How it works: Within the camera module, movable lenses or sensors compensate for shake. When camera movement is detected, the system drives these components to move in the opposite direction, physically counteracting vibrations to ensure a stable optical path into the lens.
How to Stabilize Video Using iPhone Settings and iPad
After understanding the principles of image stabilization, let's explore specific methods for achieving video stabilization on the iPhone. There are primarily two approaches, which you can choose flexibly based on your needs and shooting scenarios.
Using the Camera's Native Stabilization
This is the simplest method, as it ensures stable footage at the source without requiring post-processing, saving both time and effort.
- Pros
- Stabilized immediately after recording, no waiting required.
- No loss in image quality (for OIS) or optimized cropping (for electronic stabilization). Apple's algorithms preserve image quality to the greatest extent possible.
- Simple operation; it's the system's default option.
- Cons
- Enabling higher levels of stabilization may result in slight cropping of the frame.
- The stabilization effect cannot be turned off or adjusted in post-production.
Using iPhone 13 and newer models as an example:
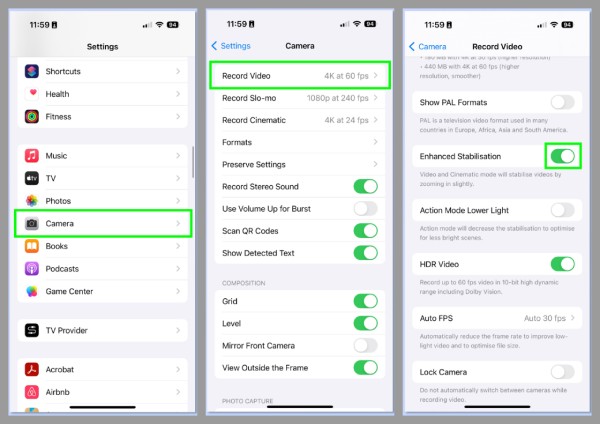
Step 1Open the Settings app, scroll down, and locate "Camera". Tap into the "Record Video" option.
Step 2Ensure the Enhanced Stabilization toggle is turned on. The system will automatically enable the most suitable stabilization mode.
Post-Production Stabilization with iMovie
If your raw footage exhibits slight shakiness or was imported from another device, iMovie can help remedy the issue. In addition to removing shakiness, iMovie crop video and add effects features are also highly functional, and it offers excellent compatibility with iPhones. It automatically identifies the primary moving subject within your video and compensates for camera shake through subtle cropping adjustments. Additionally, this feature offers a stabilization percentage option, allowing you to freely adjust the intensity of stabilization based on the severity of the footage's shakiness.
- Pros
- Free and easy to use, iMovie is an official Apple app with an intuitive interface.
- Offers robust editing features and is well-suited for iPhone video formats.
- Cons
- To achieve stabilization, it slightly enlarges and crops the video edges.
- For severely shaky footage, the effect is limited and may cause unnatural distortion.
Step 1Click "New Media" to import your video and drag it onto the timeline. Select the video clip on the timeline.
Step 2Click the "Crop" button (a square with diagonal arrows) in the bottom-right corner.
Step 3In the pop-up menu, select the "Stabilize" (a handheld camera shape), then toggle on the "Stabilize Shaky Footage" switch.

A Powerful Alternative to iPhone Stabilization Settings
While iMovie's stabilization feature is easy to use, its method of achieving stability by cropping the frame results in some loss of composition and offers limited customization options. If you're seeking a video processing tool that leverages advanced algorithms for superior stabilization and comprehensive functionality, 4Easysoft Total Video Converter is a powerful option worth considering.
Advanced AI technology to smooth shaky footage, effectively fixing camera shake issues.
High-quality video output, with the ability to upscale videos to 4K resolution.
Supports multiple editing functions, combining format conversion, editing, and quality enhancement in one.
A preview window is visible to check all applied changes before saving.
100% Secure
100% Secure
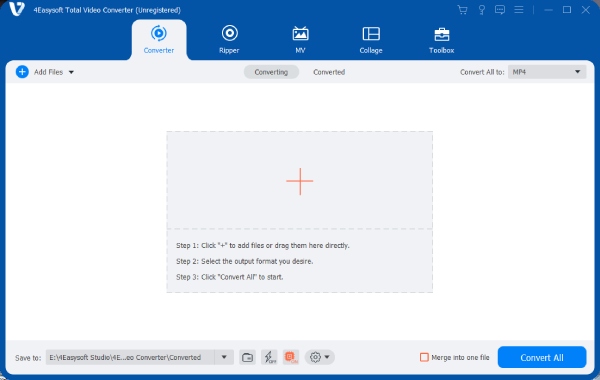
Step 1Launch the software, import your target video, and navigate to the top "Toolbox," select "Video Enhancer".
Step 2In the feature panel, click the "Reduce Video Shaking" toggle to activate core stabilization.
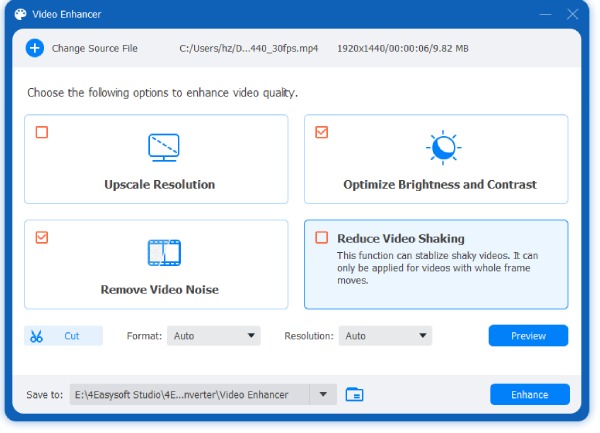
Step 3Preview stabilization effects in real-time via the preview window. You can click "Cut" to get more editing functions.
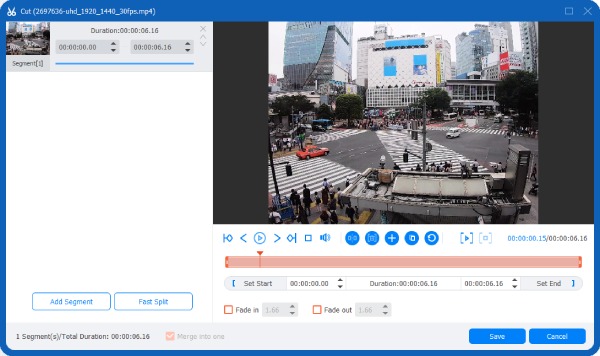
Step 4Once satisfied with the results, click "Enhance", select output format and quality settings, then click "Export" to get the final product with one click.
Other Tips to Prevent Video Shake Before Editing
While powerful post-production tools can correct camera shake, the most ideal video footage often stems from stability during filming. Mastering the following professional techniques can significantly enhance image quality at its source.
Hold your device steady
• Grip your camera or phone firmly with both hands, keeping your elbows close to your body.
• Stand firmly with your feet planted, maintaining your center of gravity.
Use Stabilizing Equipment
• Employ a tripod, gimbal stabilizer (like a handheld gimbal), or suction cup mount.
• If no tools are available, rest the device against a wall, tabletop, or other stable surface.
Use Higher Shutter Speeds (for Cameras)
• Increase shutter speed when lighting permits to minimize blur caused by camera shake.
Conclusion
In summary, utilizing the camera's built-in image stabilization or employing professional tools for post-processing are both effective preliminary solutions. If you seek to eliminate camera shake entirely while preserving image quality and gaining access to comprehensive video optimization tools, then 4Easysoft Total Video Converter is your ideal choice. Its AI-driven intelligent stabilization and powerful video processing capabilities effortlessly transform your footage into stable, professional-grade masterpieces.
100% Secure
100% Secure