Basics
Introduction
4Easysoft Total Video Converter is incredibly easy-to-use video converter software with AI technologies. It can convert all the popular video and audio formats, and extract audio tracks from video files to other audio formats. It also provides video editing features to make movies, slideshows, collages, animated GIFs, split screen videos, and more others. You can access various editing features, including merge, effect, trim, crop, watermark, and snapshot. Moreover, there are dozens of toolkits to polish the videos, such as enhancing videos, applying 3D effects, adding/removing watermark with AI technologies. The following is a detailed user guide giving you full knowledge of how to use this software.
Register
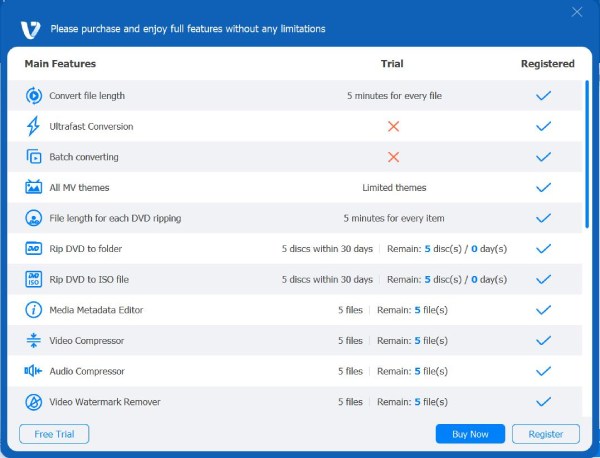
The trial version of 4Easysoft Total Video Converter has some limitations, such as added watermark, lossy conversion, limited files, etc. Here is the comparison between the free and registered versions.
You need to register the software by entering your Email address and registration code to explore the full functionalities.
Step 1 Click the three-bar button at the topper-right corner of the program and choose the Register button to enter the Registration window.
Step 2 Enter your Email address in the first blank and then copy and paste the registration code from your Email into the second blank. Click the Activate button at the bottom to activate the program accordingly.

Note: Make sure your internet is available while registering. And if you have any trouble, you can click the Support button to get assistance.
Update
To fix bugs and add new features, 4Easysoft Total Video Converter needs constant updates. Remember to check whether it is the latest version, and the methods provided below can help you do so.
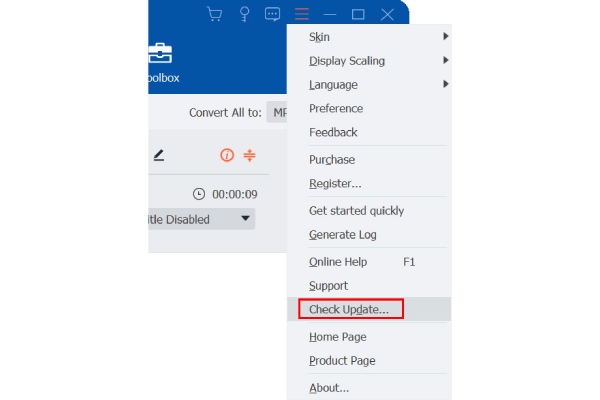
Method 1: Click the three-bar button at the topper right corner and choose the Check Update button. If there is a need to update, you can just download and install the latest version.
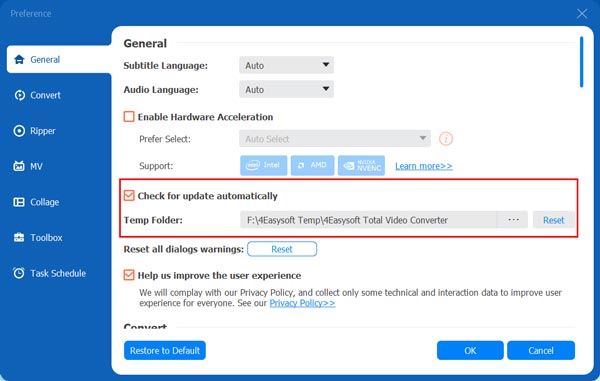
Method 2: Choose the Preferences under the menu. Click the Check for Updates automatically option from the General section. Once the automatic update is activated, you will be reminded to update whenever there is a need.
Method 3: Go to the Product Page to directly download the latest version.
Preference
Click the Menu button with the three dots at the upper-right corner of the program and click the Preference button. You can choose the desired settings according to your requirements.
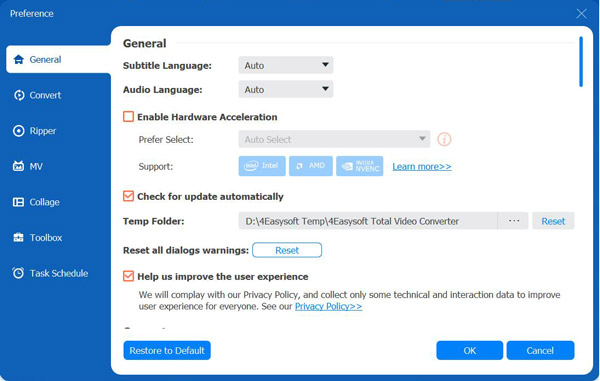
General
In the General section, you can configure Subtitle Language, Audio Language, GPU Acceleration, and Update settings.Follow the detailed steps to enable the GPU acceleration, which will improve the conversion speed to 60x faster than before.
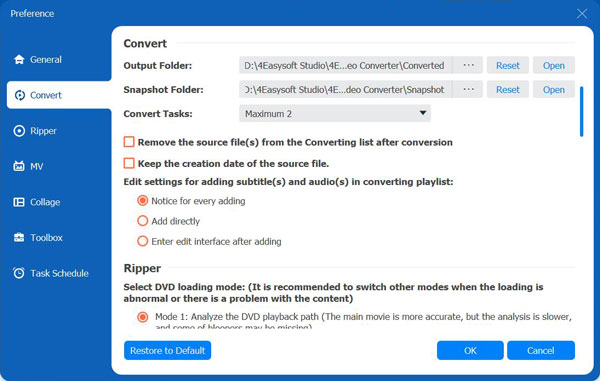
Convert
In the Convert section, you can choose the desired output folders for converting and taking snapshot. You can also configure the maximum conversion task to keep the fast speed for every file.
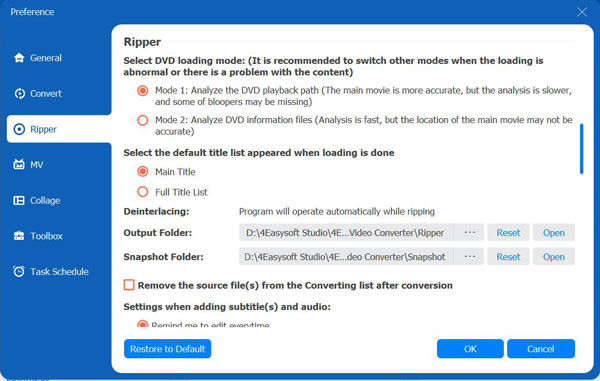
Ripper
In the Ripper section, you can select DVD loading mode, depending on whether you want fast speed or accurate analyze. The output folder is also decided by you. What’s more, you can choose delete the source file automatically and directly to save more space.
MV & Collage
In the MV and Collage section, you can set the desired output folder of edited and collage videos.
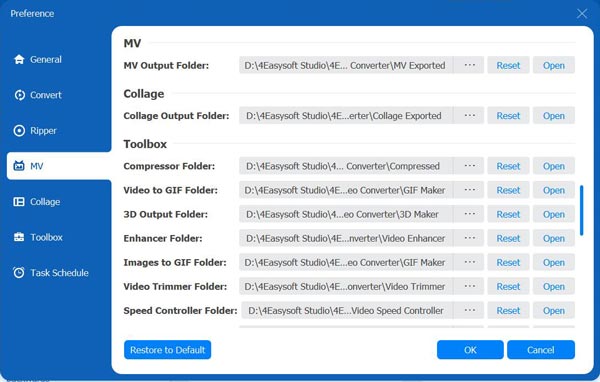
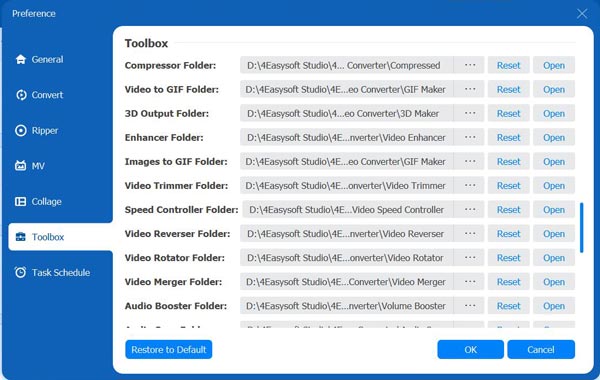
Toolbox
In the Toolbox section, you can configure the compressed folder, GIF folder, 3D output folder, and other 15+ output folders created by different functions.
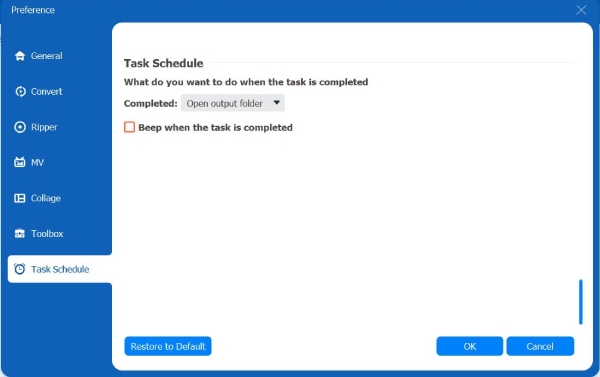
Task Schedule
In the Task Schedule option, you can choose what to do when the task is completed. You can set it to open the file folder, exit the program, or even sleep the computer automatically after the task finished. Ticking the checkbox ahead Beep when the task is completed will remind your the task process.
After adjusting all you need, you can click the OK button at the bottom right to save the settings. If you want to reset it to factory settings, you can click the Restore to Default button on the left.
Main Features
How to Use Video/Audio Converter
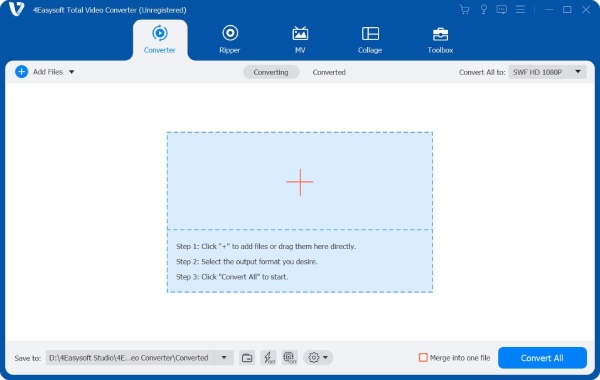
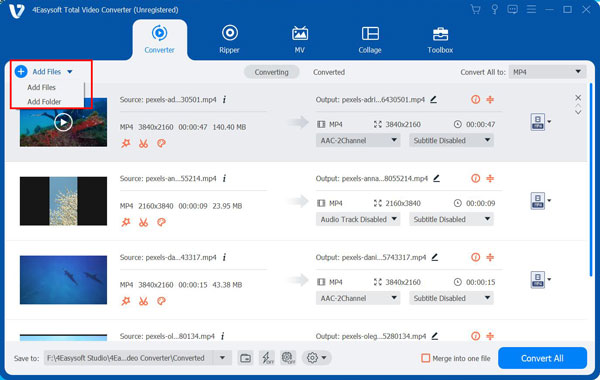
Step 1Add Videos files
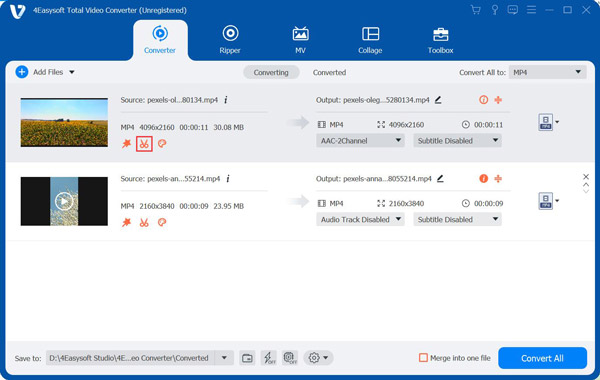
When you launch and register the 4Easysoft Total Video Converter, you can click the Add Files button at the upper left corner of the program. Choose the files you want to convert and click the Open button to import the files. Alternatively, you can simply drag media files into the software.
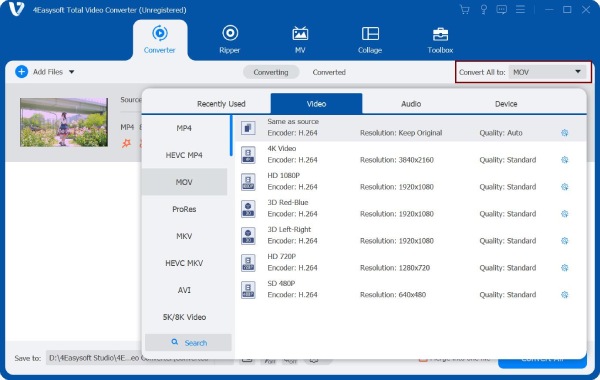
Step 2Choose an output format
Click the Format button on the right of the file, and you’ll see the list of video and audio formats. You can choose the desired one to convert to with customized resolution. You can also select the format from the Device tab with the prefect preset settings for Apple devices, Android phones, TVs, and even game consoles.
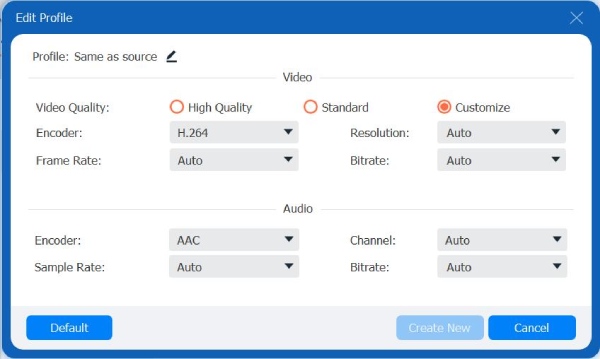
Step 3Customize the settings
Click the Custom Profile button with the Gear button to change the video and audio parameters. You can adjust the codec, frame rate, quality, sample rate, etc. In this way, you can keep the original high quality.
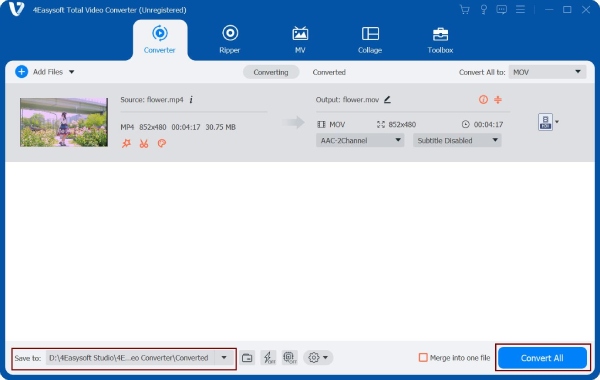
Step 4Start converting
Choose the storage path by clicking the Save to dropdown list. Then, click the Convert All button to start converting the selected files. You can also tick the Merge into one file option to merge multiple files into one file. The whole process might take minutes, depending on the file size.
How to Rip DVD Disc
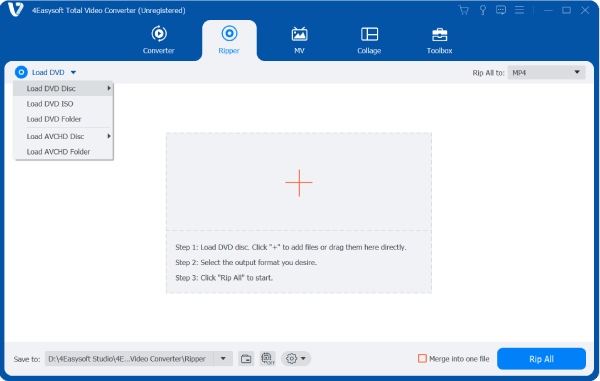
Step 1Add DVD Disc
Click the Ripper tab and click the Load Disc button at the top-left corner. Here you can add DVD/AVCHD disc or ISO files. If you want to rip DVD disc, please insert your disc with internal or external driver at first.
Step 2Choose the Output Format
Click the Rip All to drop down list to select the desired format to rip. You can click the Custom Profile button to set the parameters as you like. After that, you can also click the Edit or Cut button to add filters, effects, watermarks, etc.
Step 3Rip All DVD
After editing your video, go back to the main interface and click the Save to dropdown list to choose the file folder. At last, click the Rip All button to start ripping all DVD videos at 60x faster speed.
How to Make MV
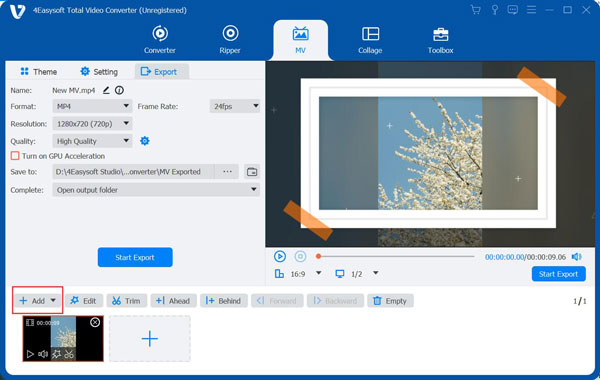
Step 1Add files
Once you have launched the program, choose the MV tab from the above menu. Click the Add button to import video clips or images. Then you can preview the file playing on the top-right section. Next, you can drag with your mouse or click the Ahead or Behind button to arrange the order of the files at the bottom.
Step 2Edit videos
To edit or trim the whole video, you can click the Edit button or Trim button. Of course, you can edit the videos or pictures separately. In this way, you can rotate and clip the video, adjust effects, add filters, watermarks, subtitles, etc.
Then you can drag the split line in between to adjust the size for your desired composition. You can also adjust the weight and color of the frame below.
Step 3Select a theme
After editing your video, you can choose a proper theme for the MV. Click the Theme button on the upper left corner below the menu and then browse to select a preferred theme, which will be applied to your MV. You can check the effect on the right section.

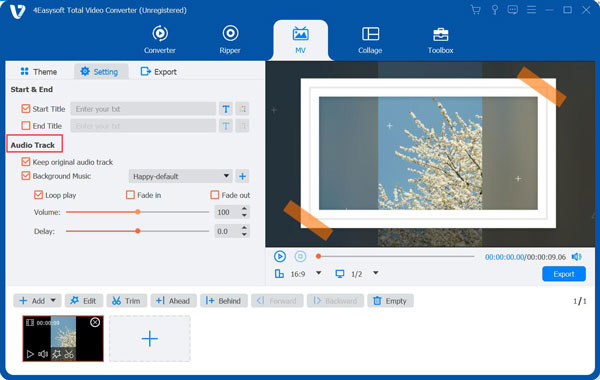
Step 4Set the title and audio track
Click the Settings button to add a title at the beginning or in the end. Just enter your text, and adjust the font and color by clicking the buttons beside.

As for the audio track, you can choose to keep the original audio track or add new background music. Moreover, you can tick the Loop Play to play the background music in a continuous loop, and add Fade in/out effect to set the audio transition. The volume and the delaying time of the audio are also available to adjust.
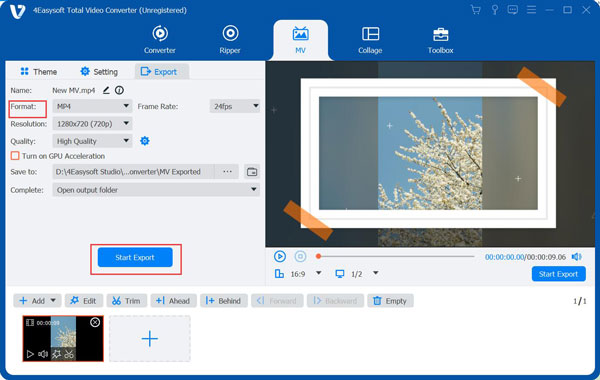
Step 5Export MV
Commonly, the output file is in the format of MP4. But you can change it from the Export tab and the Format option. Here you can export your MV in MP4, MOV, MKV, WMV, AVI, and GIF formats. In this section, you can also configure other settings like Resolution, Quality, and Frame Rate. Finally, click the Start Export button below to get your MV.
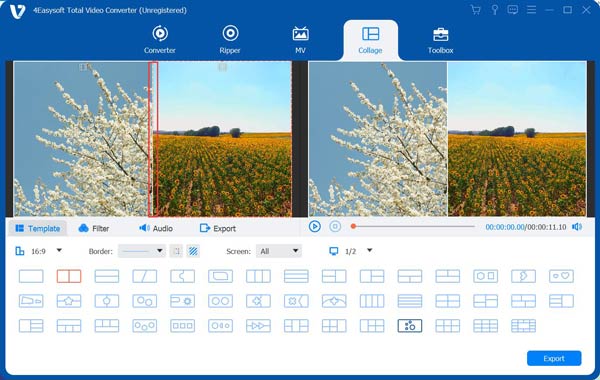
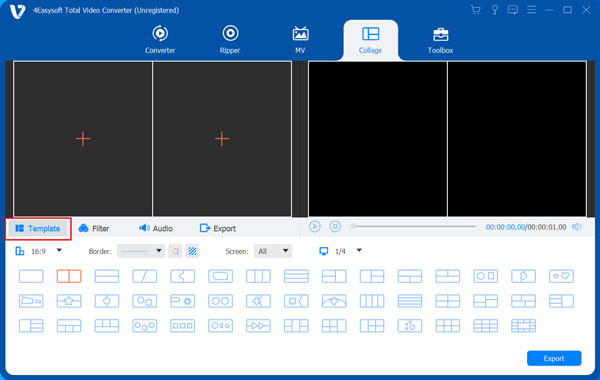
How to Make Video Collages
Step 1Choose a split-screen style
After launching the program, click the Collage menu. Then, click the Template button to select a split-screen style according to your needs among the layouts below.
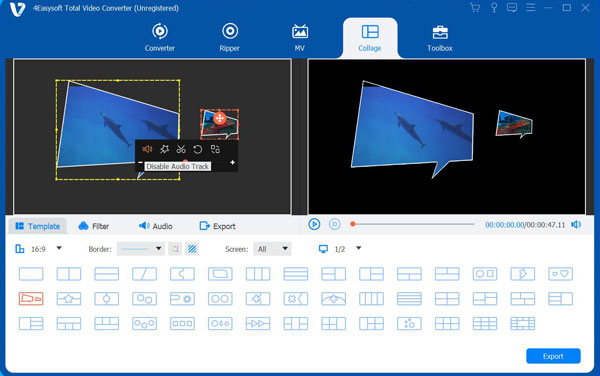
Step 2Add files
Click the Add button in the different screens to add the videos or videos you want to merge into one. And you can drag the split line in between to adjust the size for your desired composition. You can also adjust the weight and color of the frame below.
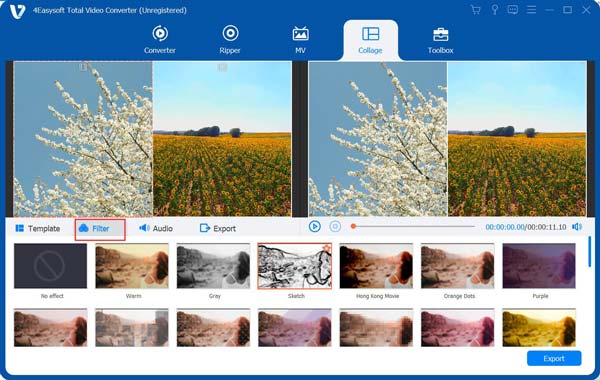
Step 3Edit videos
You can edit the video clips respectively by selecting the one you want to edit and clicking the Edit button that appears. There will be a new window where you can crop, rotate, add subtitles, etc. You can also cut the video by clicking the Cut button beside.
Now you can go to the Filter tab to select the desired preset filter for your video. It provides some basic video filters, such as warm, gray, purple, cool, pink, dusk, and more. You can also apply snow, aperture, slik, square, and more to make your videos more beautiful.
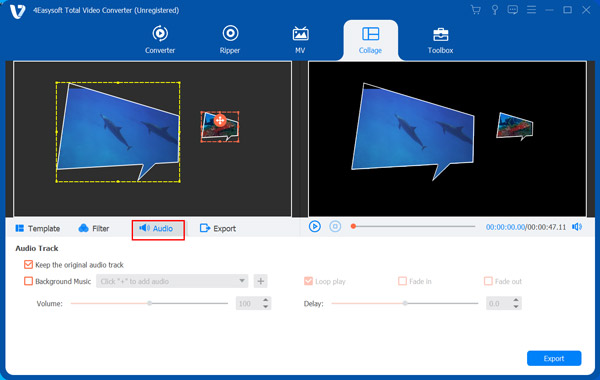
Step 4Add background music
To add background music, you can navigate to the Audio tab and tick the box before the Background Music, and then you can add a music file by clicking the Add button beside. Also, you can choose to keep the original audio by checking the box before the Keep the Original audio track. Moreover, you can set the volume and choose to loop play and fade in or out.
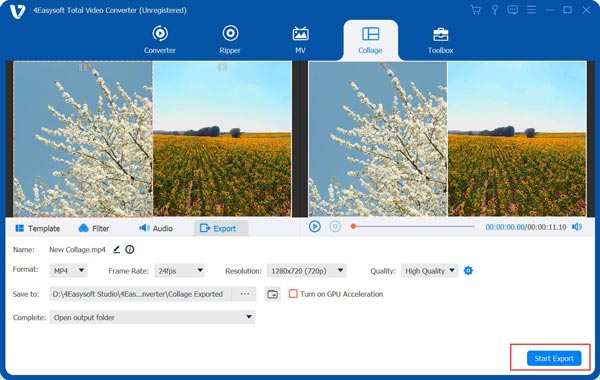
Step 5Export video
Go to the Export tab, where you can give a name for your work, select output format, adjust the resolution and quality, etc. Finally, click the Start Export button at the bottom right corner to produce your project.
Editing Functions
How to Trim and Split Video
Step 1Select a video file and click the Cut button with the Scissors button under the source file name.
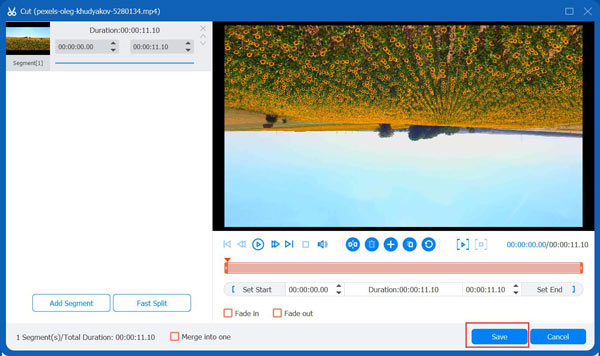
Step 2Drag the clipper on the progress bar to cut off unwanted segments and the parts included in the red square will be retained. Or you can enter the start and end time at the bottom Duration bar. To get more segments, you can click the Add Segment button to create a new clip. To split the video quickly, you can click the Fast Split button to choose to split by average or by times.
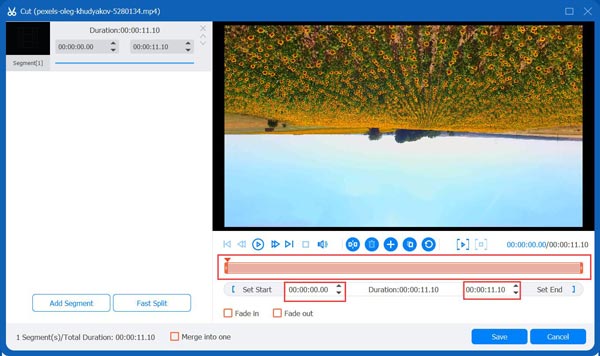
Step 3In the end, you can click the Save button to produce your split video. To merge all the segments into one, you can tick the Merge into one at the bottom left of the window. When you are back to the main interface, you can preview the video before exporting. Then, click the Convert All button to export the trimmed videos.
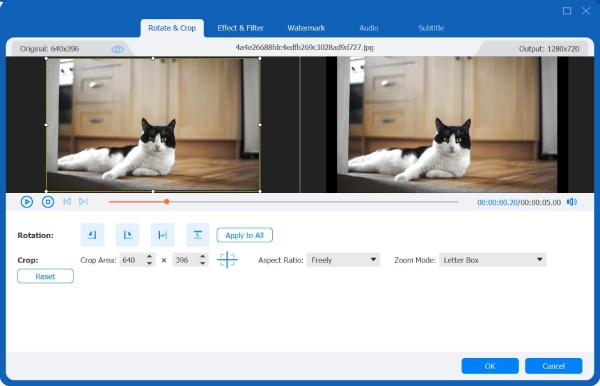
How to Rotate and Crop Video
Step 1Select a file and click the Edit button with a Star Ward button. Go to the Rotate & Crop tab in the new window. You can choose to flip video vertically or horizontally, and rotate 90 degrees, 180 degrees, or 270 degrees. The result will be displayed above instantly.
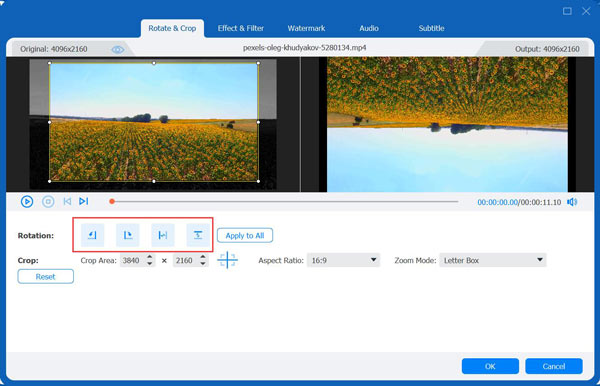
Step 2In the Crop option, you can also crop the video to the desired aspect ratio for different social platforms, including 16:9, 4:3, 1:1, and 9:16. To get other sizes, you can select the Freely option and enter the number in Crop Area. Moreover, you can choose the Zoom Mode, including Letter box, Pan & Scan, and Full to adjust the black bars on the edges.

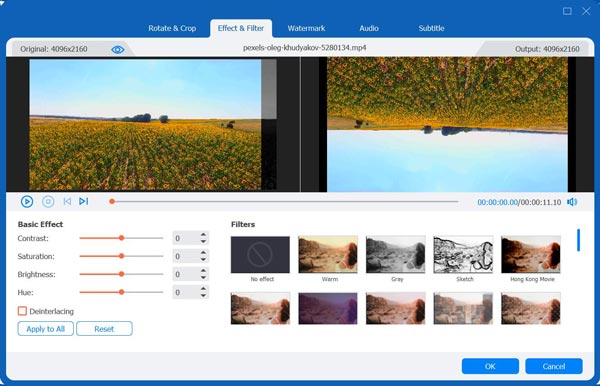
How to Adjust Video Effect and Filter
Under the Effect & Filter tab, you can adjust brightness, contrast, saturation, hue by dragging the slider accordingly and choosing the Deinterlacing option on the left. Of course, there are many preset filters for you to make different effects, including Warm, Gray, Sketch, etc.
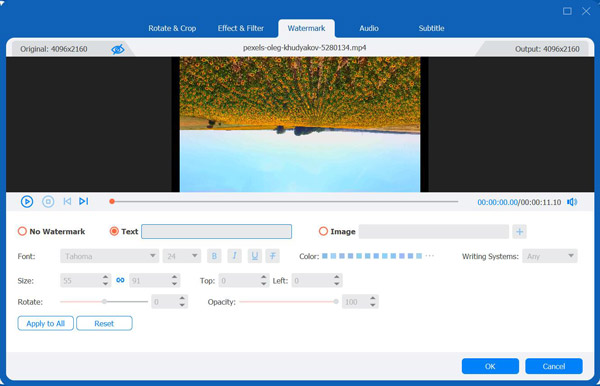
How to Add Watermark to Video
Choose the Watermark tab from the menu, and you can enter the text or images to add the watermark to your videos. You can adjust the text font, size, color, and other settings to make unique watermark. Moreover, you can can put the watermark wherever in the video a you like.
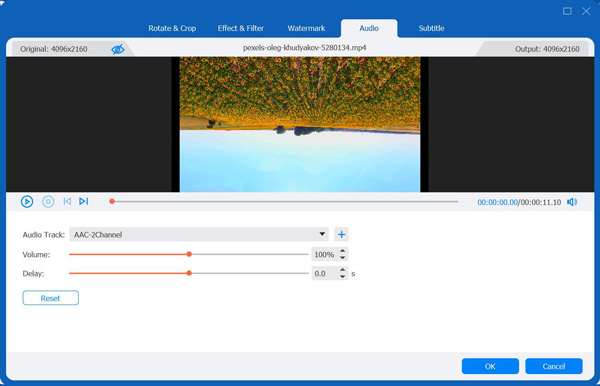
How to Adjust Audio
Add new audio track by clicking the Audio tab. Click the Add button to select the audio track you want to play. You can also drag the slider below to change the volume. If the image doesn’t match the sound, you can move the Delay slider to sync the video and audio tracks.
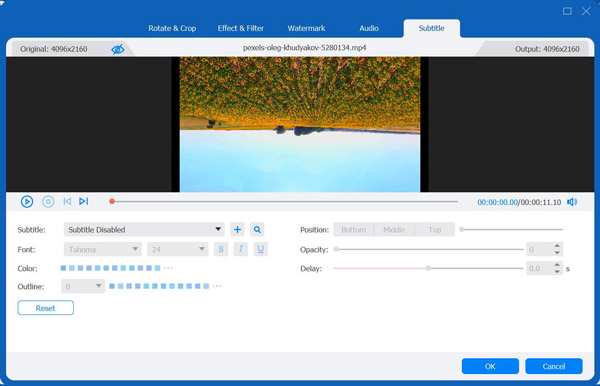
How to Add a Subtitle
Navigate to the Subtitle menu and click the Add button to import the subtitle file (*.srt; *.ssa; *.ass). Then, you can adjust the position, font, color, outline, opacity of the subtitle. Also, you can change the delay time to match it with the video.
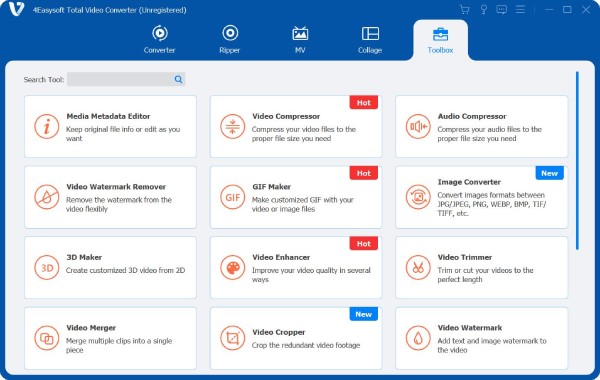
Toolbox
Besides the powerful converter, ripper, MV creator, and video collage editor, 4Easysoft Total Video Converter also provides 20+ functional tools for you. You can compress video, control the video speed, enhance the quality, and even convert image format from the Toolbox tab.
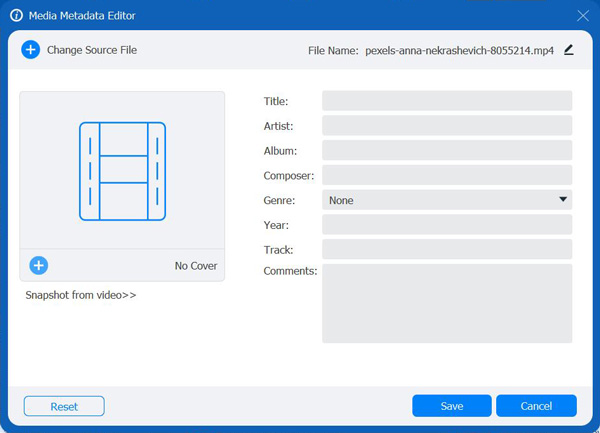
Tool 1-Media Metadata Editor
This media metadata editor enables you to change the original file information according to your need. The supported format includes MP4, M4A, M4R, M4P, M4B, 3G2, M4V, MOV, MP3, WMA, ASF, WMV, WAV, and AVI. What’s more, you can edit the file name, title, genre, artist, album, etc, which will help you classify batch of files.
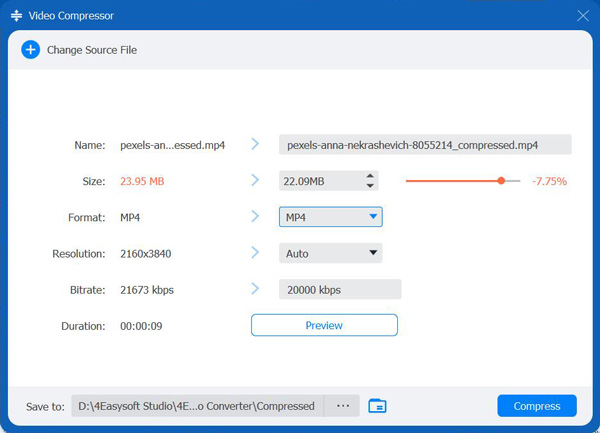
Tool 2-Video Compressor
Navigate to Video Compressor in Toolbox. Click the Plus button to add a video file. Next, you can set the name, size, format, resolution, bitrate of the file. Then, you can click the Preview button to check your compressed file and the Compress button to start the compression.
Tool 3-Audio Compressor
Click the Audio Compressor button and add your music. Then you can pull the Size slider to compress your audio file to less than 40% of the original size. You can also adjust the format, channel, bitrate, and sample rate to change the compatibility and quality.

Tool 4-Video Watermark Remover
Go to Video Watermark Remover in the Toolbox and click the Add button to add a video file. Click the Add watermark removing area button to choose the desired area by dragging the frame or entering the number in the blank of the Size, Top, and Left on the bottom right.
You can also drag the red progress bar under the video or change the number below to adjust the watermark removing area for specific periods. After that, click the Play button to preview the effect.
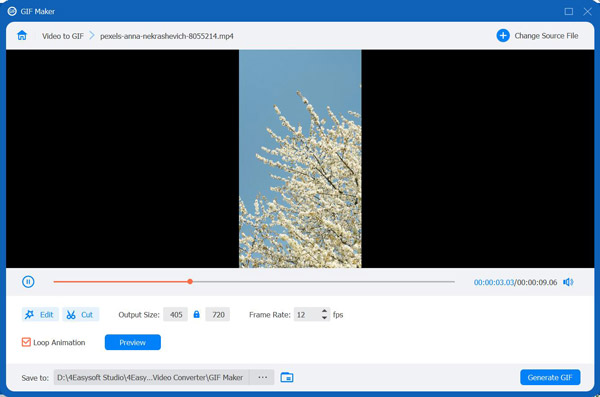
Tool 5-GIF Maker
Under the GIF Maker tool, you can add videos or images to make animated GIF. Click the Edit button to rotate, crop, add effects, etc. You can even click the Cut button to trim the video. Also, you can change the output size and frame rate to keep the high quality and smoothness. At last, click the Generate GIF button to produce your GIF.
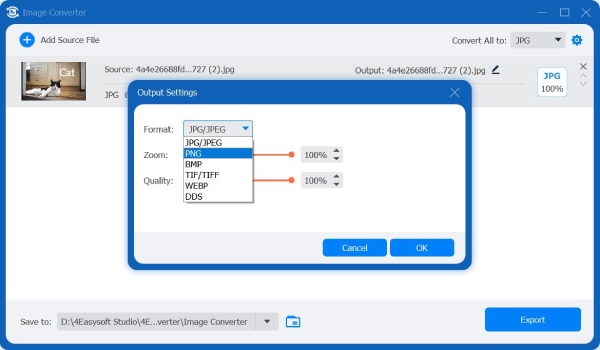
Tool 6-Image Converter
Click the Image Converter button and add a batch of images into the tool. Then you can add your pictures and click the Format button on the right of the file. You can choose to convert images to JPG, PNG, BMP, TIFF, and WEBP. You can also adjust the image size and quality as you like.
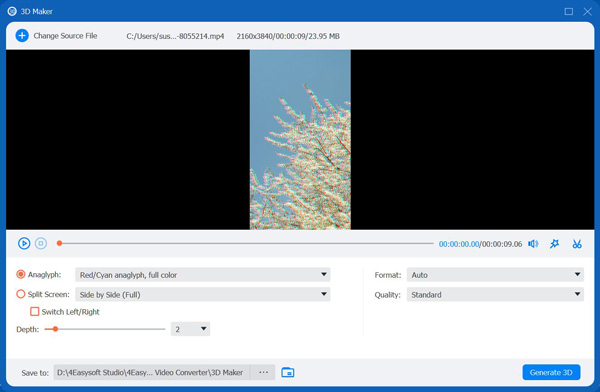
Tool 7-3D Maker
Find 3D Maker in the Toolbox and click the Add button to add the video file. Then you will see several functions below. Anaglyph allows you to choose a 3D anaglyph effect from Red/Cyan anaglyph, monochrome color to Amber/Blue anaglyph, full color. Split Screen contains various styles of split-screen from Side by Side( Half-Width) to Top and Bottom (Full). You can also change the depth of the 3D image from 0 to 15. Besides, you can check the box before the Switch Left/Right to change the direction of the effect.
Tool 8-Video Enhancer
This AI technology equipped video enhancer enables you to improve the video quality from 4 aspects. Upscale Resolution allows you to get superb video quality, including 1080p to 4K. Optimize Brightness and Contrast will automatically optimize the brightness and contrast to make your video more enjoyable. Remove Video Noise can remove the video noise to make your video cleaner. Reduce Video Shaking can stabilize shaky videos, but only applied for videos with whole frame movies. Just tick the box to apply the effect.

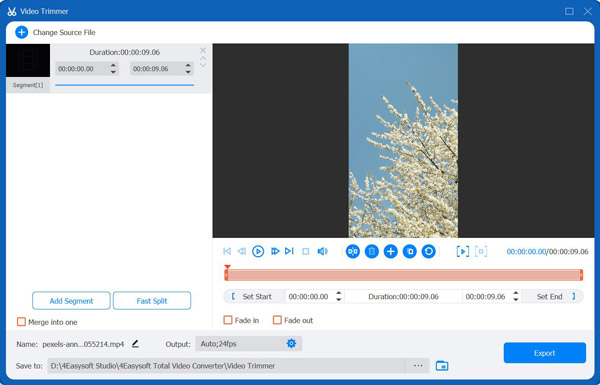
Tool 9-Video Trimmer
The Video Trimmer can cut the unwanted parts of your videos. Just drag the clipper on the progress bar to cut off unnecessary segments and the parts included in the red square will be retained. Or you can enter the start and end time at the Duration bar. To split the video quickly, you can click the Fast Split button to choose to split by average or by times.
You can also add the Fade in/out effect to add the natural transition between several clips. Then, you can tick the Merge into one at the bottom left of the window.
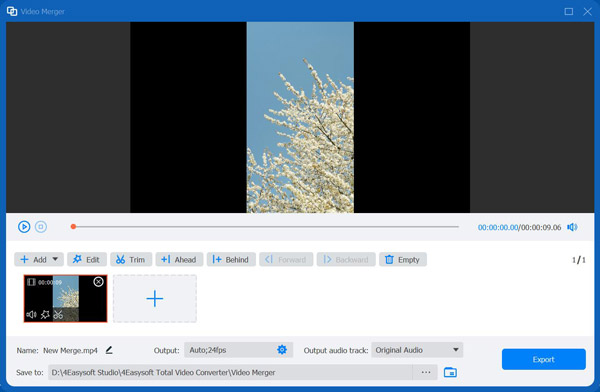
Tool 10-Video Merger
There is also a single video merger for you to combine several videos. Go to Video Video Merger tool and add your files by clicking the Add button. You can drag the videos with your mouse to arrange the order of clips. There are also several functions you can use, like Edit and Trim, which will make your video more beautiful.
Tool 11-Video Cropper
In the Video Cropper tool, you can choose the Aspect Ratio to quickly get the desired size, including 16:9, 4:3, 21:9, etc. To get other sizes, you can select the Freely option and enter the number in Crop Area. You can also drag the frame of the left screen to adjust the size, and if you want the center screen, you can click the Cross button beside so the cropped screen will be at the center.

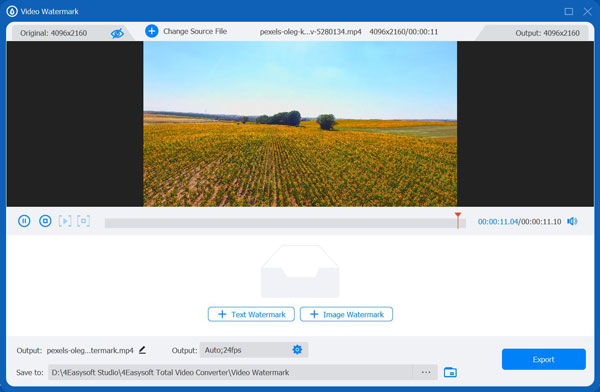
Tool 12-Video Watermark
Go to Video Watermark in the Toolbox to add text or image watermarks. Click the Text Watermark button to enter the desired text and adjust the text font, size, color, and other settings below. To add an image watermark, you can click the Image Watermark button and select an image from your computer. Then, you can easily change the image size and positions to fit your video.
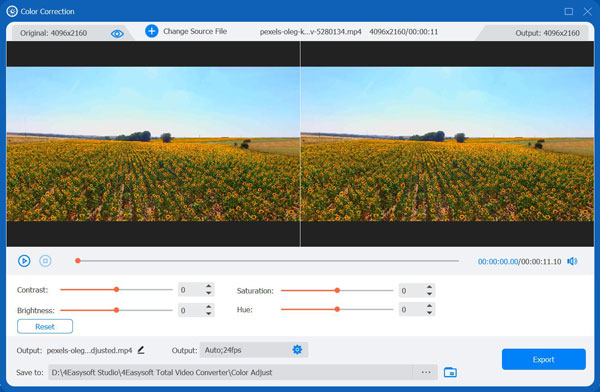
Tool 13-Color Correction
Here you can adjust the brightness, contrast, saturation, and hue of your videos by dragging the slider accordingly. After that, you can click the Play button to preview the result. It’s not easy as the preset filter, but you can make unique effect in this way.
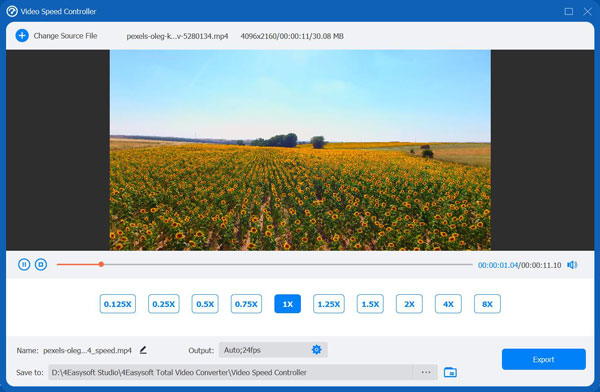
Tool 14-Video Speed Controller
Go to Video Speed Controller and add your video file. Then you can select a playback speed below the video, ranging from 0.125x to 8x. In this way, you can easily slow down or speed up GIF to make funny effect. After that, you can change the frame rate and resolution to keep the high quality.
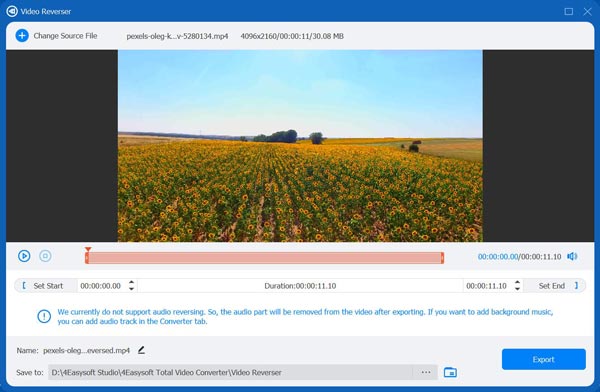
Tool 15-Video Reverser
Navigate to Video Reverser in the Toolbox and click the Add button to select the video file. Adjust the progress bar below the video or the time set to choose the video clip to be reversed.
At the bottom, you can rename, adjust the output settings, and the path to save the video. In the end, you can click the Export button to export the new video.
Note: the sound will be removed if the video clip is reversed, so you can go to the Converter tab to add background music if you want.
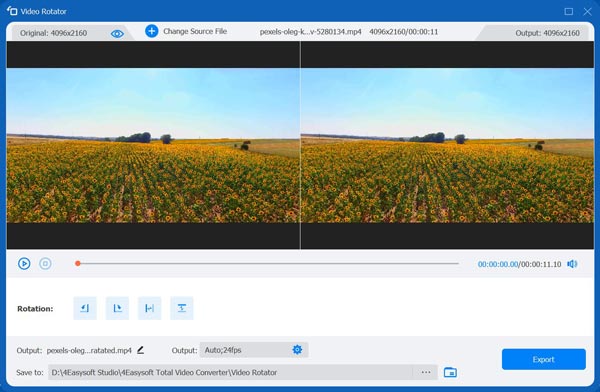
Tool 16-Video Rotator
Click the Video Rotator button in the Toolbox and add your videos. You can choose to flip video vertically or horizontally; rotate 90 degrees, 180 degrees, or 270 degrees. The result will be displayed above instantly. Check the effect before saving it.
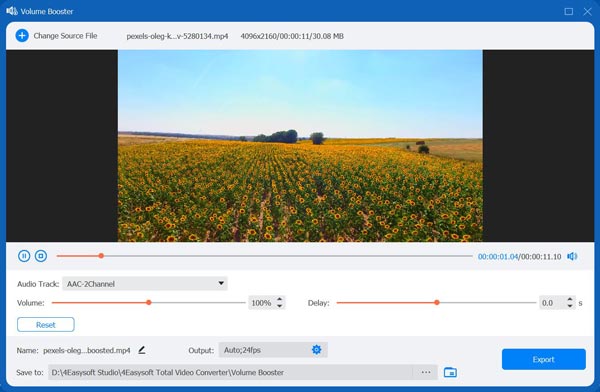
Tool 17-Volume Booster
Go to Volume Booster in the Toolbox and click the Add button to add the video file. Then you can raise or decrease the voice of the video by dragging the point on the bar. Pleas listen to it and export it later with the wanted format.
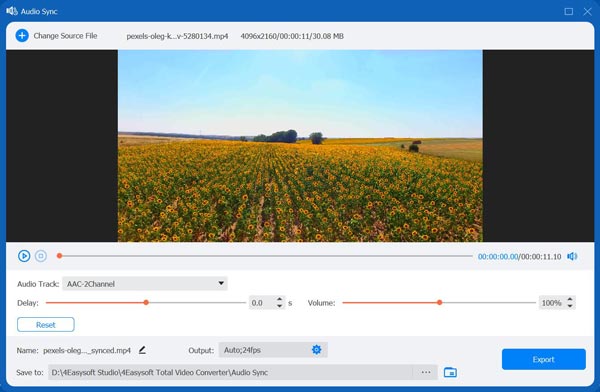
Tool 18-Audio Sync
Open Audio Sync tool in the Toolbox and drag the slider bar to adjust the delay time of the sound. Generally, you will sync the audio and video by previewing the result every time. Moreover, you can also change the volume if you want.
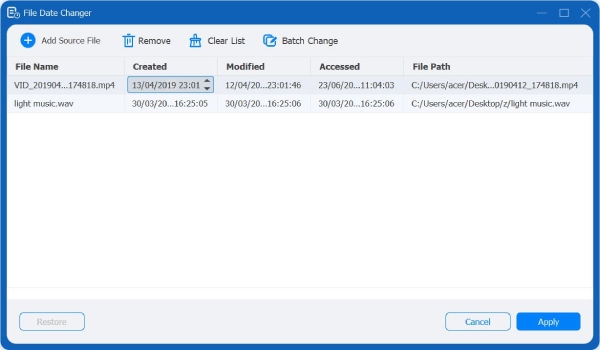
Tool 19-File Date Changer
Open the File Date Changer tool, and you can see the created, modified, and accessed date of the videos. When you want to protect your privacy, you can easily change the file date as you like.
Tool 20-Noise Remover
Open Noise Remover. Upload your video. Tick the checkmark before Enable audio noise reduction to remove background noise. You can select audio track, adjust audio volume, and adjust audio delay.

Tool 21-Video Player
Open Video Player. Import your video into this tool. Click the Play button to watch a video. You can adjust display screen size, playback speed, and volume while watching.

 For Windows
 For Mac
 Free Online Solutions